Saturday, June 18, 2011

Quark Cream with Cranberry Curd


Quark is the one food item from Germany I miss the most, besides Bratwurst, of course. Quark is such a common item in Germany, it's something you always have in your fridge. It can be described as a fresh cheese, a curd, similar to frommage blanc.

Germans eat it for breakfast in muesli, in desserts and also savory on a slice of bread. And of course not to forget, the German style cheesecake is baked with quark. It makes the cheesecake a little more fluffy, but I also like the American cheesecake; they're just two different things.

When I first lived in California, I was hunting all over the place to find quark. Nowadays if you are lucky, you will find it in some stores, but the price is just really expensive. I am talking at least 10 times as much as you would pay in Germany. So, you can imagine how happy I was when I found Meeta's post on making homemade quark. I make it every few weeks now, so I always have a supply on hand.

The quark cream I made is very versatile and can be used as a base for many desserts. Since I still had cranberries I made cranberry curd as a topping, but any other fruit will be good.

Key Lime Pie Macarons


I have never tasted Key Lime Pie before or even seen Key Limes in the supermarket. So I was pleasantly surprised when I finally saw those green little balls in the store the other day. Key limes are more tart and aromatic than regular limes and they are also a lot smaller in size. They are named for their origin, the Florida Keys.

The first thing I made was of course Key Lime Pie, which tasted very good and had a great tartness. The filling is traditionally made with sweetened condensed milk. After making the pie, I had some leftover filling and egg whites. This made me think they would make good macarons.

The tartness of the filling compliments the sweetness of the macaron shells very well. You will have some leftover filling. You can either use it as pie filling (baked in a pie crust instead of the ramekins), or just eat it as a yummy lime curd.

I am submitting these Macarons to Mactweets, a Macaron Lovers' group I just discovered. Every month there is a different theme for Macarons. You should check out the great creations on their pages. This month theme is Valentine's Day. Well, on the first look my Macaron might look not very Valentine like, but after the winter who wouldn't want to spend a romantic getaway on the Florida Keys.

Green Tea Shortbread Cookies


Since I have been living in Vancouver, I have tasted a lot of desserts made of matcha powder. Matcha powder is finely ground green tea leafs. You will find little matcha cream cakes, matcha macarons, really yummy green tea gelato and even matcha latte.

I bought a little can of this intense green powder a while back, but haven't used it until I saw these Green Tea Shortbread Cookies in "Unforgettable Desserts" by Dede Wilson. They are really easy and fast to make, and have a nice subtle taste of green tea.

Green tea desserts can be an acquired taste, so I would recommend to start with just one tablespoon of matcha powder.

Burger-Style Macarons


I haven't participated in the Mac Attack Challenge for a while, but this month's theme was so interesting I wanted to give it a go. Ballpark-snack macarons are the topic of this month's Mactweets. I have actually never been to a big ballgame in Germany, neither have I been at a hockey game all those years I lived in Canada. I know, shame on me, but in my defense, I have been to several football and baseball games while I was living in San Francisco.


The football games always started with a tailgate party, which was totally new to me. I mean who would bring half of his kitchen to a parking lot. But it was always a lot of fun, often more than the actual game. Most people would make burgers, and this is what I wanted to make as my macarons. I have seen similar Macs a while ago and always wanted to try them, since they looked so cute.


Ganache filled macarons are always on the sweet side, but with all the fruit toppings it tastes really good. They would make a cute dessert for any BBQ party or picnic.

Thursday, June 16, 2011

Little Owl's Meatball Sliders

In the September 2007 issue of Bon Appetit they have a section devoted to Small Restaurants, Big Ideas. One of the first recipes they feature is the Meatball Sliders from the Little Owl in the West Village. You can find the recipe here on Epicurious’ website.
Cover
I first learned about Chef Joey Campanaro via the NYC foodie blogs like Gothamist, Eater and Grub Street and even saw him participate in a food network special, which he won, dealing with turkey for an "alternative" take on Thanksgiving.
His restaurant, The Little Owl, is a huge hit in NYC.
This recipe seemed pretty straight forward and easy, so I decided to make it for one of our Sunday evening dinners. Instead of the arugula it calls for, I substituted baby spinach lightly dressed with a little olive oil, lemon juice, salt and pepper. I followed the rest of the recipe exactly as described except of course for the onions in the sauce. I also ran out of fresh parsley for the meatballs this time around.
What I really like about this recipe, aside from the fact that it is pretty easy to make, is the addition of fennel seeds to the tomato sauce,. It really adds a different layer of flavor to the sauce. If I were to make any changes to this I would probably rub a freshly cut garlic clove over the cut rolls after bringing them out from the broiler. BTW the rolls are just some basic yeasty dinner rolls I bought at Wal- Mart, very tasty surprisingly.I would have to say that this recipe is a must add to anyone’s collection. It could be an appetizer, a hearty meal or a perfect tailgating dish for a late October, early November LSU football game.
Oh and if anyone has noticed the quality of the pictures improving, I’l have to credit some killer tips from Matt over at Matt Bites and my lovely wife Ann whose hobby is photography as well.
  http://chickenfriedgourmet.com/little-owls-meatball-sliders/

Saturdays with Rachael Ray – Club Burger Sliders with Avocado-Ranch Dressing

  This hamburger is like a club sandwich turned burger. If you love club sandwiches, and you love burgers, I’ll guarantee you’ll love this!
Recipe Notes:
  • the recipe calls for “good-quality” bread. I would definitely follow that. That was my biggest mistake on this recipe – using cheap bread. I don’t normally buy the cheapest store brand bread, but for some reason, for this recipe I did. It totally fell apart when we ate these little burgers. I’m sure it would have been a lot less messy if I would have spent the extra 50 cents to upgrade the bread!
  • this recipe makes way more of the dressing than you will need. But it is great as a veggie dip or chip dip. It wasn’t bad to have extra, in my opinion!!
  • Both my husband and I thought that the flavor of the bacon was a bit lost inside of the burger. Next time, I’d just fry it up and serve it on top instead of in the burger.

Club Burger Sliders with Avocado-Ranch Dressing
from Everyday with Rachael Ray Jun/Jul 2010
makes 8 sliders, or 4 servings
total time: about 30 minutes
extra virgin olive oil, for drizzling
6 slices bacon, chopped
2 pounds ground turkey
1 small onion
1 tablespoon hot sauce
2 tablespoons poultry seasoning
salt and pepper
1 avocado
1 cup sour cream
juice of 1 lemon
1 clove garlic, grated or finely chopped
a small handful of fresh chives, finely chopped
a small handful of fresh dill, finely chopped
a small handful of flat-leaf parsley, finely chopped
16 slices good-quality white or whole wheat bread
lettuce leaves, for serving
2 plum or vine-ripened tomatoes, thinly sliced
Preheat an outdoor grill or griddle pan to medium high. Place a skillet over medium-high heat. Add a drizzle of EVOO and the bacon to the pan and cook until crisp, about 5 minutes. Drain on paper towels to cool, then chop.
While the bacon cooks, place the turkey in a large bowl. Grate the onion on top of the turkey to get 3 to 4 tablespoons onion juice. Add the hot sauce, poultry seasoning, salt and lots of pepper. Add the cooked bacon, mix and form 8 slider patties, about 2 1/2 to 3 inches wide. Drizzle with EVOO to coat lightly. Cook on the grill or griddle, turning once, until cooked through, 8 to 10 minutes.
While the sliders cook, preheat the broiler. Place the avocado in a food processor. Add the sour cream, lemon juice, garlic, chives, dill and parsley; season with salt and pepper. Process into a smooth, thick sauce.
Using a 3-inch round cookie cutter, cut out rounds of bread (or trim 1 inch of crust all the way around the bread slices to form small squares); discard the crusts.* Arrange the bread on a baking sheet and toast under the broiler. Serve the bacon-turkey sliders with the lettuce, tomatoes and avocado-ranch sauce between the toasts.
*TIP – stick the extra bread in a zip top bag and throw it in the freezer. Next time you need breadcrumbs, pull the bag out, process the bread in a food processor, and you have fresh breadcrumbs!
———————————–
Saturdays with Rachael Ray rules:
  • You can link any blog post, present or past, as long as it is a Rachael Ray recipe.
  • Your blog post must link back to this post, mentioning Saturdays with Rachael Ray.
That’s it!! Simple, simple. Just make sure the recipe is a Rachael Ray recipe – it doesn’t matter if it comes from her talk show, 30-Minute Meals, her magazine, or one of her cookbooks. But it must be from Rachael Ray. Any posts that don’t follow these two rules will be deleted from the Mr. Linky.
I can’t wait to see what you’ve made!  http://www.tasteandtellblog.com/2010/06/saturdays-with-rachael-ray-club-burger-sliders-with-avocado-ranch-dressing/

Wednesday, June 8, 2011

Bounty


It's Friday and time to plan the Saturday visit to the local Farmers Markets!
We have Amish farmers in our area who bring beautiful, organic fruit, veggies and home-baked goods. Yum! Here's a squash recipe I hope you enjoy. This is for three acorn squashes or about 3 1/2 pounds. Preheat oven 400 degrees F.


Ingredients:

3 Tbs. unsalted butter, melted
1/4 cup plus 1 Tbs. water
1/4 cup fresh orange juice
2 Tbs. finely chopped orange zest
1/4 cup maple syrup
(optional) 2 Tbs. chopped fresh thyme
1/4 cup chopped dried cranberries
Cut the ends off squash, then cut crosswise into 1/2 inch thick slices. Cut seeds out (can use a biscuit cutter). Place squash rings in a large bowl and season generously with sea salt & pepper. Toss with 2 Tbs. of the melted butter. Arrange the squash rings in a large ovenproof sauté pan.In a small bowl, whisk together the 1/4 cup water, orange juice and zest. Pour over the squash rings. Set the pan over medium-high heat, cover and cook until the squash rings are almost tender when pierced with a fork, about 15 minutes.
In a small bowl, whisk remaining 1 Tbs. melted butter, 1 Tbs. water, maple syrup, (opt) chopped thyme and cranberries. Pour over squash.
Bake uncovered, until squash rings are tender when pierced with a fork, 15 to 20 minutes.
Serves 8. Williams-Sonoma Kitchen.   http://oldsweetwatercottage.blogspot.com/search/label/Autumn?updated-max=2009-10-08T02%3A00%3A00-07%3A00&max-results=20

Front Porch

Is this the quint-essential Autumn front porch?
I want to drink hot apple cider when I walk inside of this home, don't you?
The mix of round pumpkins with square bales of hay, flanked with linear corn stalks is no mistake.
It's good design.
Even the flag helps tell the "story" of this home.
Do you decorate your porch, deck or door? 
http://oldsweetwatercottage.blogspot.com/search/label/Autumn

The Vase


A large glass vase is the most versatile decor accessory we can have, in my humble opinion. For autumn, fill it with mixed nuts of filberts, pecans, hazelnuts, Brazil nuts and walnuts, which are abundant in the store right now. Or choose one favorite nut, as shown. Pick up colorful leaves and pine cones on your walk. Crabapples look good with a few leaves tucked in. Pebbles or stones are simple, but elegant.

What do you put in your clear vase?  http://oldsweetwatercottage.blogspot.com/search/label/Autumn
 

I Adore Harvest Tables

 I've always wanted a narrow antique harvest table IN the center of the kitchen as a place to eat and prepare food. It reminds me in history, how servants would serve dinner in the formal dining room to the master of the house, but ate in the kitchen at the *harvest* table. It seems honest, unpretentious and wholesome to me. By definition, a harvest table should be six to eight feet long and usually has hinged drop-leaves and/or drawers. Here are some nice examples. Anyone got one?


Green-Tea Cranberry Spritzer

 
Nothing welcomes guests for an outdoor party like a spritzer. Made with or without wine, they make refreshing, elegant coolers.

  • Yield Makes 4  

    Ingredients

    • 1/3 cup sugar
    • 1/3 cup water
    • 4 green tea bags
    • 1/2 cup chilled unsweetened cranberry juice
    • Ice
    • 3 cups chilled seltzer

    Directions

    1. Bring sugar and water to a boil in a saucepan. Cook, stirring, until sugar dissolves. Let cool completely. Steep tea bags in 2 cups boiling water for 2 minutes. Remove bags. Let cool completely. Divide tea, cranberry juice, and the simple syrup among 4 ice-filled
      glasses. Top with chilled seltzer.  http://www.marthastewart.com/348506/green-tea-cranberry-spritzer

Homemade Punch Is The Sweetest Drink

If you decide not to serve alcoholic beverages at your wedding, whether it’s due to budget constraints or personal views about alcohol, you might want to serve a variety of other drinks. The best kinds of drinks are homemade punches because they taste great, look beautiful, and take you back to a time when you ran around barefoot in your grandma’s yard every summer.
My grandma would make the best pineapple-strawberry punch. She would always put actual fruit in the punch as well to give a better taste. Sometimes she would put in orange slices or lime slices into the pineapple-strawberry punch to give it more of a tart taste.
I suggest that you serve a few types of punches at your wedding and let your guests choose which one they want. Put the drinks in a nice punch bowl and label each one. This is also a way to make your guests more interactive each other because they will gather at the punch table and chat. Even if you serve alcohol at your wedding, not everyone drinks (especially if you have kids around) and may want to try some of your homemade punch. It’s cheaper than buying it from a store, it’s fun to make, and it’s healthier for you.
punch-bowl.jpg   http://www.mydreamwedding.ca/79/homemade-punch-is-the-sweetest-drink/

12 Non-Alcoholic Drinks for Your Wedding Reception

cocktail-themeDrinks are just as important as the food in the reception. Most wedding experts would agree with this. Many weddings today often serve alcoholic drinks to get the party started and to liven up the festivities. However, this is not compulsory. If you and your partner feel that you are better off not to serve alcoholic drinks in your big day, then so be it.
Having no alcohol in the menu does not mean that the reception party will be boring. To spice up the event, here are some exciting non-alcoholic drinks that will make your wedding reception a hit.
1. Madras
A popular drink in the Southern United States, the madras is a fruity concoction made of orange and cranberry juices. You can create this without adding vodka. Serve this beverage in a champagne flute with ice and garnish with a spitted cherry.
2. Sparkling Cider
A non-alcoholic version of the champagne cider, the sparkling cider is a lightly carbonated juice from fresh apples. It contains no concentrates, no sweeteners, no preservatives and definitely no alcohol. This is purely apple juice, healthy and delicious!
3. Tom Collins
The Tom Collins, which is an old gin drink that was popular in the early 20th century, is served in a tall glass with an added lemon juice and carbonated soda water. Garnish with a maraschino cherry or an orange slice.
4. Tequila Sunrise
A tropical drink perfect for beach or outdoor weddings, this one is made with a mix of orange juice, grenadine or cherry syrup. Serve in a tall glass, add some ice and garnish with spitted cherry or orange slice.
5. Wild Berry Mojito
This drink, a mix of some berries, mint, and lime, can surely be a unique drink that would amaze your guests. Do not forget to spritz with soda water to give it a fizz.
6. Cosmopolitan
HBO’s Sex and the City made this drink popular once more. This drink is made of cranberry juice, some orange syrup, and drops of limejuice. This is best served in a rocks glass and garnish with lime.
7. Neon lemonade
Neon lemonade minus the vodka will wow guests with its bright blue color and enticing sour taste. It is lemonade or lemon sour mix added with a dash of blue-tinted fruit punch. Also served in a tall glass with spitted cherry or orange slice.
8. Long Beach Iced Tea
Another drink ideal for beach weddings, the long beach iced tea is a combination of orange, cranberry, and pineapple juices with a dash of grenadine on top. Serve this enticing drink in a slim tall glass with a lemon wedge and cherry.
9. Non-Alcoholic Punch
A punch does not always need to have alcohol, right? Enjoy this merry mix of fruit juices minus the alcohol.
10. Long Island Iced Tea
A refreshing mix of lemonade and brown cola, this can be a hit among friends who love iced tea. Serve this in fun tumblers and garnish with lemon wedge or slice.
11. Lime Rickey
This drink is made of limejuice, dashed with simple syrup, topped with a club soda and garnished with lime peel.
12. Brewed Coffee, Espresso or Mocha Frappe
Juices are not the only non-alcoholic beverage you can serve during your wedding. Delicious coffee and other similar beverage can surely make guests forget that you are not serving alcohol in the party.
Serving non-alcoholic drinks will offer many advantages. For one, it will help you avoid embarrassing moments of having intoxicated guests say or do things they should not do. Also, serving beverage with no alcohol can give you maximum savings on your wedding budget, as alcoholic drinks do not come cheap.  http://www.mydreamwedding.ca/1924/12-non-alcoholic-drinks-for-your-wedding-reception/

Saturday, June 4, 2011

Victorian Iced Tea


 Victorian Iced Tea
Pretty and refreshing, this flavored iced tea was well-received at the Victorian-theme shower. To vary the taste, simply mix in a different fruit juice or blend than the one called for in my recipe.-Robin Fuhrman, Fond du Lac, Wisconsin
10-12 ServingsPrep/Total Time: 30 min.

Ingredients

  • 4 individual tea bags
  • 4 cups boiling water
  • 1 can (11-1/2 ounces) cranberry-raspberry juice concentrate, thawed
  • 4 cups cold water
  • Ice cubes and fresh mint

Directions

  • Place tea bags in a heat-proof pitcher; add boiling water. Cover and
  • steep for 5 minutes. Remove and discard tea bags. Cover and
  • refrigerate tea.
  • Just before serving, combine cranberry-raspberry concentrate and cold
  • water in a 2-1/2-qt. pitcher; stir in tea. Serve on ice. Garnish
  • with mint. Yield: 10 (1-cup) servings.   http://www.tasteofhome.com/Recipes/Victorian-Iced-Tea/Print

Thursday, June 2, 2011

My Mother’s Famous Chinese Egg Rolls


mothers-famous-chinese-egg-rolls-recipe
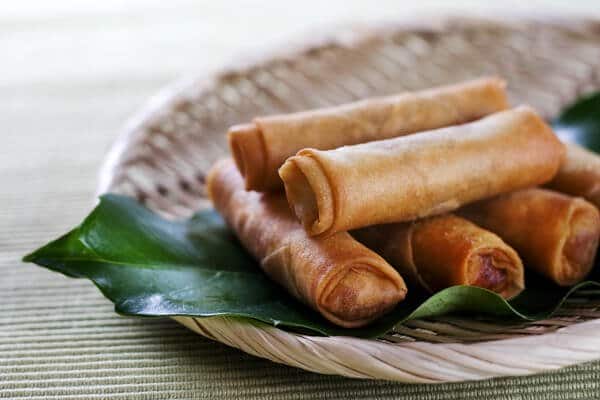
These are my Mom’s Famous Crispy Chinese Egg Rolls and a recipe that I published way back in 2007 but somehow got lost in the Internet void. Thank goodness that this recipe was part of my cookbook so I still had the text and photos. ~Jaden
***
This is one of those recipes that is a little more time consuming to make, but one that’s my favorite because 1) it’s my Mom’s recipe 2) everyone who has tried them instantly declare they are the best they’ve ever had 3) you can make a big batch of them and freeze them. I usually call a couple of my girlfriends over and we have an eggrollin’ party where we’ll make a massive batch of them, enjoy them fresh that night and have enough for all to take home and freeze. If you are making these with friends, I’d suggest doubling the recipe so each person has some to take home to freeze. I promise you they will taste just as good fried after frozen and you will never taste better egg rolls than these. BUT – you must follow my Mama’s rules.
Ready?

Mama Ruthie’s Egg Roll Rules

Mama’s Rule #1: Your egg roll filling ingredients must be drained of excess moisture and cooled before rolling. Soggy, hot filling makes soggy egg rolls.
Mama’s Rule #2: Use the right kind of wrapper. The size I get is 8 x 8 inches (20 x 20 cm) around and come 25 wrappers to a package. These wrappers are light, paper-thin and fry up to a shatteringly crisp crunch. Oh yes, before I forget – “spring roll” and “egg roll” are interchangeable and mean the same thing. Sometimes my regular American grocery store will have “spring roll pasta sheets” that are in the refrigerated produce section. Do not use those – they are way too thick! Let’s just say that if it has Italian writing on the package, it probably ain’t the good stuff for Chinese egg rolls.
Rule#2A. Treat the wrapper right. You also want to keep the wrappers covered with a damp towel at all times to prevent the edges from drying and cracking.
Mama’s Rule #3: Roll small and tight! Sloppy and loosely rolled egg rolls will break apart and allow oil to seep into the inside of the roll. Mama says baaaad. One time I was watching a celebrity chef on television making monster egg rolls the size of a cola can. Who in the heck can wrap their mouths around that thing? It looked hideous. Mama’s egg rolls are elegant and skinny. Don’t be too greedy and overstuff them! And roll them tight so that the filling doesn’t fall out while frying! Remember the days when you were younger and rolled your own…um…cigarette? Channel those rolling skills back.
Mama’s Rule #4: Lay the rolled egg rolls neatly with a piece of parchment, foil or wax paper in between each layer if you are stacking them on top of each other. Keep them covered with plastic wrap or a towel to prevent drying. If you are freezing, freeze them in like this first. Once frozen, you can gather them up and transfer them to a plastic freezer bag. If you roll them out and jumble them all together in a big pile, they’ll eventually stick to each other and you’ll tear the delicate skin trying to pry them apart.

How to make my Mother’s Famous Chinese Egg Rolls

The printable recipe is below, but here are step by step photos on how to wrap. The recipe is for ground pork as the filling, but as you can see in these photos, the filling is very flexible. I’ve used chopped shrimp, ground chicken, ground beef, ground turkey, very thinly sliced pork (almost like matchstick sized). In these photos, I used crawfish and diced Chinese sausage!
These photos are just a guideline to teach you how to wrap (and the wrong way to wrap Chinese Egg Rolls!)
After you fry the filling, you’ll want to spread it out to cool on a baking sheet. Tilt the baking sheet and prop it up so that all the juices accumulate. You’ll discard this juice. Too much juice in filling makes soggy eggrolls.
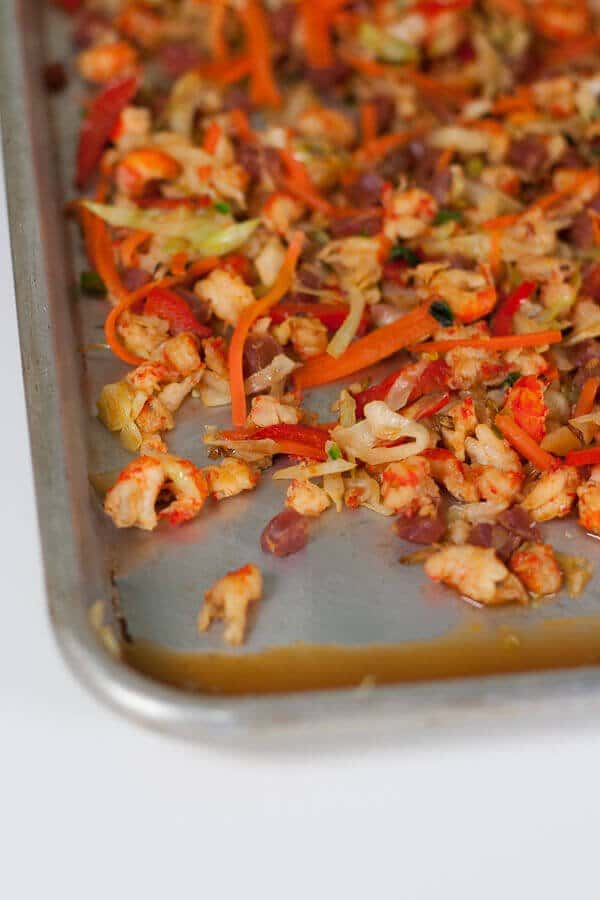
mother-famous-chinese-egg-rolls-recipe drain
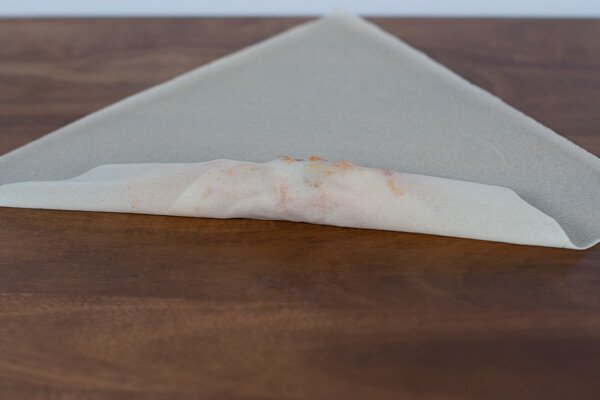
Lay the wrapper on a clean, dry surface as shown. Spoon just a heaping tablespoon of filling near the bottom corner. Resist the urge to over stuff with too much filling!
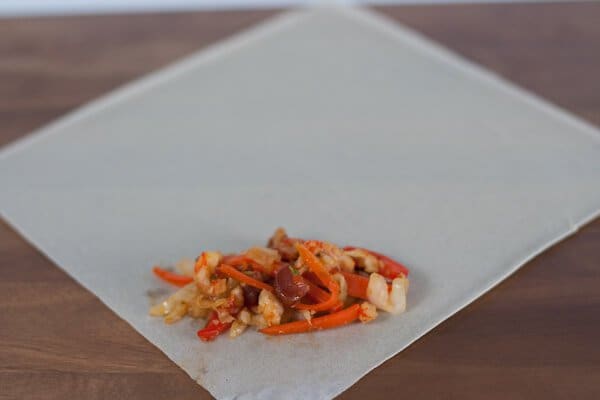
mother-famous-chinese-egg-rolls-recipe filling
Lift the bottom corner up and begin rolling until you reach halfway up.
mother-famous-chinese-egg-rolls-recipe roll tight
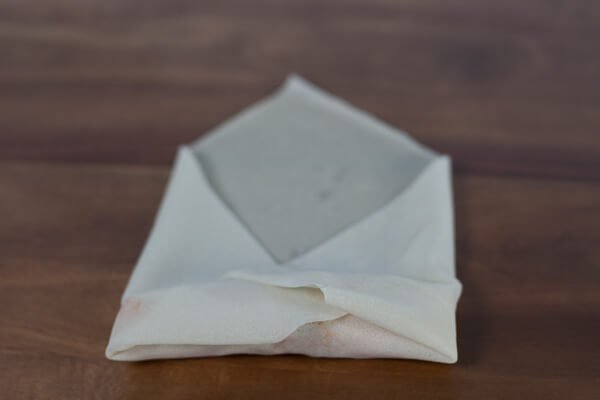
Fold over the left side, and then the right side towards the center.
mother-famous-chinese-egg-rolls-recipe
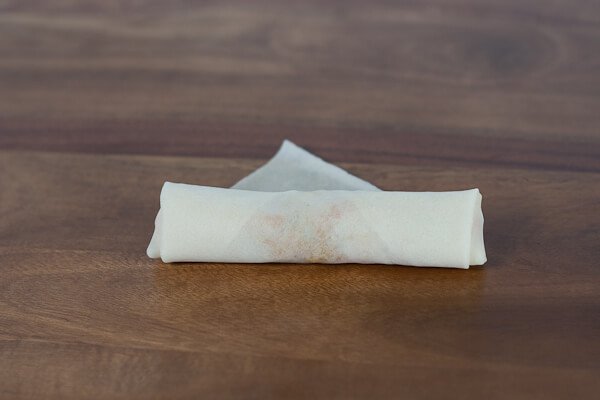
Continue folding up with a tuck-roll-tuck-roll motion. Dip your fingers into the cornstarch slurry and brush all over the final top corner. Finish up the roll and seal.
mother-famous-chinese-egg-rolls-recipe seal tight
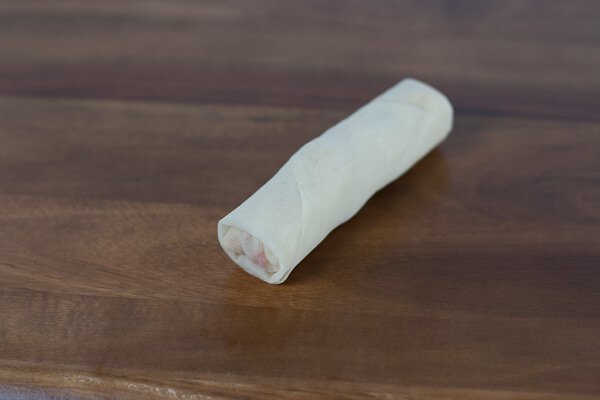
See how tightly the egg roll wrapped? Any holes or large air pockets will allow oil to seep in, resulting in a greasy egg roll! The width or diameter of the egg roll should ONLY be 1.25-inches. If you make them any larger (i.e. too much filling) you’ll end up with less egg rolls.
mother-famous-chinese-egg-rolls-recipe finished

The wrong way:

Common mistake is to not fold over and tuck good enough. See that big space? Oil seeps in and will make your egg roll greasy.
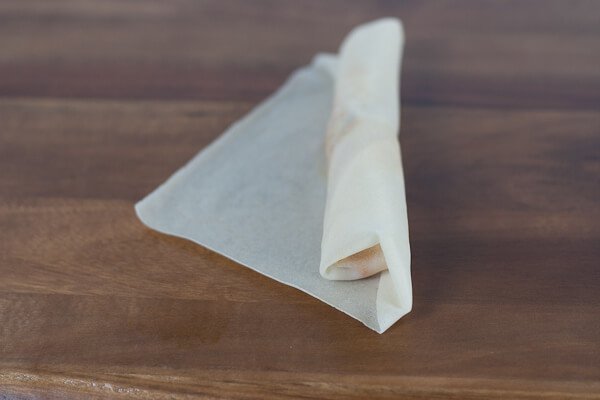
mother-famous-chinese-egg-rolls-recipe big hole
Big holes = your egg roll will fall apart while frying.
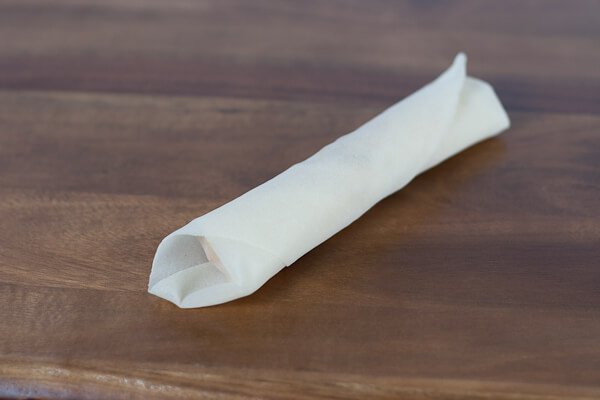
mother-famous-chinese-egg-rolls-recipe too loose
See the difference between the above photo and this one?
mother-famous-chinese-egg-rolls-recipe finished
Print

Mother's Famous Chinese Egg Rolls Recipe

Servings: Makes 50 egg rollsPrep Time: Cook Time:
Once you make these egg rolls, you'll never make them any other way! Make sure you get the correct egg roll wrappers. They should be FROZEN and very thin, almost paper thin. Do not use egg roll wrapper found in the refrigerated section (usually near tofu) in Western supermarket - they make starchy, thick, gooey egg rolls with big bubbles on outside when you fry. It's important to make sure you keep your wrapper and rolled egg rolls under plastic wrap so that they do not dry out!

Ingredients:

50 Spring/Egg Roll Wrappers (about 2 packages), defrosted unopened at room temperature for 45 minutes or in the refrigerator overnight
1 tablespoon cornstarch (or flour) mixed with ¼ cup of cool water
Oil, for frying
FOR THE GROUND PORK
1 pound ground pork
1 tablespoon soy sauce
1 teaspoon cornstarch
1/4 teaspoon sugar
freshly ground black pepper
FOR THE VEGETABLES
2 to 3 cloves garlic, very finely minced
½ head of cabbage (about 11 ounces)
3 carrots, shredded
1 teaspoon grated fresh ginger
10 fresh shiitake mushrooms (or dried black mushrooms soaked overnight), stems discarded
1 tablespoon cooking oil (canola, vegetable, peanut)
1 tablespoon Chinese rice wine
1 tablespoon soy sauce
1/4 teaspoon sugar
1/2 teaspoon salt
1 teaspoon sesame oil
Freshly ground black pepper

Directions:

1. To make the filling, combine the ingredients for the ground pork together. Marinate at least 10 minutes. In the meantime, shred the cabbage and the carrots using your food processor or by hand. Slice the mushrooms into very thin strips (or you could use your food processer and pulse a few times to get a fine dice.
2. Heat a wok or large saute pan over high heat. Add the cooking oil and swirl to coat. Add the pork and stir-fry until no longer pink, about 2-3 minutes. Turn heat to medium-low, push the meat to one side of the pan. Add the garlic, cabbage, carrots, ginger and the mushrooms and stir-fry for 1 minute, until the vegetables are softened. Add the rice wine, soy sauce, sugar, sesame oil and black pepper. Continue to stir-fry for another minute. Scoop out the filling to a baking sheet and spread out to cool. Prop up one end of the baking sheet so that it tilts and will allow all the moisture to drain to one end. Let cool for 15 minutes.
3. Discard all of the accumulated juices. Use paper towels to blot the filling to rid of extra oil or juice. Now, you're ready to wrap (see photos for instructions on how to wrap). IMPORTANT: Only use 1 heaping tablespoon of filling for each egg roll. These are slender egg rolls, the width of the egg roll should only be 1.25" diameter.
Keep the rolled egg rolls in neat, single layer and covered with plastic wrap to prevent drying. If you want to stack the egg rolls, make sure you have layer of parchment paper in between the layers to prevent sticking. Keep wrappers also covered with plastic wrap to prevent drying. Refrigerate up to 4 hours until ready to fry or freeze.
4. To fry the egg rolls, fill a wok or pot with 2 inches of high-heat cooking oil. Heat the oil to 350°F (175°C) or until a cube of bread will fry to golden brown within 10 seconds. Gently slide in or lower the egg rolls, frying 4 to 6 at a time, turning occasionally until golden brown about 1½ minutes. Place on wire rack to drain and cool.
NOTE: To fry frozen egg rolls, do not defrost the egg rolls – just add them to the oil frozen, frying 4 to 6 at a time. Add an additional 1½ minutes to the frying time since they are frozen.  http://steamykitchen.com/13029-my-mothers-famous-chinese-egg-rolls-2.html

Wednesday, June 1, 2011

Cheesecake


Cheesecake


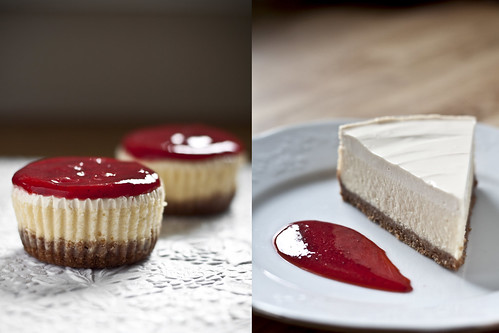
I was never a huge cheesecake fan... if given the choice of cheesecake or something else I would usually pick the something else. That was until I had met my husband, who is a huge cheesecake fan and would always pick cheesecake over anything else. I discovered this recipe, which is called Three Cities of Spain cheesecake (from Three Cities of Spain coffeehouse in New Mexico that closed in the 70's) and it converted me into a cheesecake fan! What sets this cheesecake apart is after it's baked it gets a thin layer of lightly sweetened sour cream on top, and briefly baked in the oven to set it. The addition of the sour cream helps to balance the sweetness of the cheesecake. I also prefer to use cinnamon sugar graham crackers, or add some cinnamon to a regular graham crackers crust, for an extra dimension of flavor.

Three Cities of Spain Cheesecake

Crust:
5 oz (1 1/2 cups) graham crackers finely crushed- you can also use gingersnaps, chocolate cookies, vanilla wafers
1/3 cup of sugar (you can adjust the amount or leave it out completely if using cookies that are fairly sweet)
5 TBS melted butter
1/8 tsp of salt
1 tsp of cinnamon (optional, but if using regular graham crackers I highly recommend it!)

Mix everything together in a small bowl and press into the bottom of a 8" or 9" greased springform pan (if you use a 8" pan the cake will be a little higher).

Pre heat the oven to 350 degrees. Place the crust in the oven for 5 minutes, long enough to dry out the crust. Once the pan is cool, wrap the outside in plastic wrap and then a layer of foil, using the top of the pan to help hold up the plastic and foil, make sure all the plastic is tucked inside the foil. Set aside and turn the oven down to 300 degrees.

Filling:
24 oz of SOFTENED cream cheese
4 lg room temperature eggs
1 cup of sugar
1 tsp vanilla

Topping:
16 oz sour cream
2 TBS brown sugar
1 tsp vanilla

It is very important that the cream cheese is softened so you don't end up with lumps. I like to use a mixer to mix the filling, but this could easily be done by hand as well. It is important that the sugar and cream cheese is creamed together really well so there aren't little lumps of cream cheese left. Once you start adding eggs it is important to not over mix or incorporate too much air (so the filling remains dense and creamy).

Cream together the cream cheese and sugar on medium speed, scrape down continually to make sure everything is evenly mixed. Turn the mixer down to low and add the eggs one at a time, making sure to stop and scrape after each addition. Add the next egg only after the previous one is completely mixed in. Add in the vanilla and any other desired flavors at the end. Pour into the par baked crust and put pan into a larger pan and fill it with hot water that goes 1/2 way up the sides of the pan. Bake for approximately 45 minutes. Mix the topping while the cheesecake bakes and set aside until the cheesecake is done. To test the cheesecake for doneness, gently tap the pan (the actual cheesecake, if you tap the outside pan it will make the water slosh and possibly go up into the cheesecake) and if you see it wiggle all together then it's done (as opposed to sending a ripple through the batter). After the cheesecake is done, let it sit for 10 minutes and then carefully spread the sour cream topping evenly over the top. Put it back into the oven for 10 minutes. Pull it out, let the cheesecake cool and then once it's room temperature, put it into the refrigerator and let it cool completely. Unmold and cut with a hot clean knife...
Fresh strawberries or strawberry puree make a wonderful accompaniment!

Baking options- I recently tried two other ways to bake cheesecake:

Cupcakes: Use paper liners, and press some of the crust into the bottom and par bake the same way. You don't need a hot water bath and the cooking time will be dramatically reduced (check after 20 minutes). Once the cheesecake is done, take it out of the oven and put the sour cream topping on and return it to the oven for 5 minutes. You can either leave the papers on (if letting people serve them selves, it might be easier) or you can peel the paper off before serving. It helps if the cheesecake is completely cool and thoroughly chilled.

In the pressure cooker!
Follow the directions as stated in the recipe above, but you don't need to wrap the outside with plastic and foil, instead raise it off the bottom of the pressure cooker and put 2 cups of water in the bottom, and then cover the top of the pan instead with foil. Once the pressure has been reached in the pan, cook for 25 minutes (cooking time will vary from brand to brand), take it out, and spread the sour cream on top and bake in the oven for 10 minutes at 350 (make sure to leave the oven on after par baking the crust) and you're done! I like that I don't have to mess around with the water bath and the cheesecake turned out wonderfully creamy and perfectly cooked!   http://chefandphotographer.blogspot.com/2010/03/cheesecake.html