Текст автора фото мое.
источник http://www.povarenok.ru/recipes/show/24212/Рецепт необычный, попробуйте обязательно!!! По мнению моих близких, по вкусу этот пряник гораздо вкуснее аналогов из магазина :)))) Очень прост в приготовлении, безумно вкусный и долго остается нежным и мягким!
Ингредиенты :
Сахар — 1 стак.
Яйцо — 2 шт
Маргарин мягкий — 125 г
Мед — 3 ст. л.
Корица молотая — 1 ст. л.
Сода (не гасить!!!) — 1 ч. л.
Сахар (для глазури) — 4 ст. л.
Молоко (для глазури) — 2 ст. л.
Мука пшеничная — 2,5 стак.
Повидло (любое густое) — 1 стак.
Приготовление:
1.Сахар, яйца, соду, корицу и мед перемешайте.
2.Добавьте маргарин (если не размягченный, я тру на терке). Хорошо перемешайте и поставьте на кипящую водяную баню на 10-15 мин. Периодически помешивайте.
3.У вас получится однородная воздушная масса.
4.Добавьте в эту массу один стакан просеянной муки. Перемешайте и остудите. (Я ставлю чашку с тестом в емкость с холодной водой минут на 10, периодически помешивая). ЭТО ОБЯЗАТЕЛЬНО!!!!!!!!!!!! В остывшее, теплое тесто постепенно добавляйте оставшуюся просеянную муку, хорошо размешивая вилкой, в конце замеса - руками. Количество муки приблизительное, может понадобиться чуть больше.
Если сыпать муку в горячее тесто (не остудив предварительно), то муки уйдет гораздо больше, и тесто получится очень тугое, а нам нужно мягкое и эластичное.
5.Раскатайте тесто в пласт толщиной 0,5 см и разрежьте на 9 квадратов. Стол хорошо подпылите мукой, а то тесто может прилипнуть.
6.На одну половинку квадрата положите повидло, накройте второй половиной и хорошо придавите по бокам пальцами. Тесто очень хорошо формируется и склеивается, начинка не вытечет)
7.Вилку обмакните в муку и надавите по бокам пряника - для красоты
8.Выложите на смазанный маслом лист пергамента и выпекайте в горячей духовке при температуре 180 градусов минут 10-15, не больше! Пекутся быстро - вы увидите, они хорошо поднимутся и подрумянятся.
9.Пока пекутся приготовьте глазурь: смешайте сахар и молоко, поставьте на огонь и мешайте до растворения сахара, доведите до кипения и кипятите 3-4 минуты.
10.Как только испекутся, сразу горячими смажьте глазурью и дайте остыть.
ТЕСТО НЕЖНОЕ И МЯГКОЕ ТАЕТ ВО РТУ!!!!!!!!!!!!!!!!!!

http://www.liveinternet.ru/users/3240369/post107470687
▼
Wednesday, March 23, 2011
Пополнение рогатых
Очень вкусные, нежные, рассыпчатые и ароматные рогалики. Этот рецепт я нашла в книге известной украинской хозяйки Д. Цвек. Он меня сразу заинтересовал, поскольку и рогалики, и выпечку с орехами я очень люблю. Но обилие столь разных ароматов меня несколько смущало. Я привыкла, что обычно доминирует какой-то один, а остальные его оттеняют. Здесь же все ароматы сильные и яркие, и мне сложно было представить, как же в итоге будут пахнуть рогалики. Тем интереснее было попробовать их испечь.
Результат получился очень и очень! Ароматы все смешались в очень яркий и необычный букет.
В рецепт я внесла небольшие изменения, но не думаю, что это как-то повлияло на вкусовые качества рогаликов.
Тесто:
- 100 г маргарина или сливочного масла
- 150 г муки
- 50 г сахара
- 2 яйца
- 0,5 ч.л. корицы
- 2 ч.л. разрыхлителя
- 100 г молотых грецких орехов
- 2 ст.л. молотых белых сухарей
- 100 г сахара
- 50 мл очень крепкого натурального кофе, сваренного на молоке
- ванильный сахар
У одного яйца отделите белок и отложите его в сторону.
Добавьте в масляную крошку сахар, корицу, разрыхлитель, яйцо и желток. Замесите тесто. Оно липковатое, но должно сформироваться в шар.
Если не хочет, добавьте ещё совсем немного муки.
Отправьте тесто на час в холодильник. А тем временем приготовьте начинку. Сварите кофе на молоке, процедите. Молотые орехи смешайте с сухарями и сахаром, залейте кофе до консистенции средне-густой манной каши. Поставьте смесь на медленный огонь и варите, помешивая, до загустения. Начинка должна стать пастообразной. Остудите.
Охлаждённое тесто достаньте, раскатайте толщиной 3 мм, нарежьте квадратами со стороной 6 см. На середину каждого квадрата положите начинку.
Один из углов смажьте белком. Два противоположных угла внахлёст уложите над начинкой, причём сверху должен быть тот, который смазали белком, чтобы рогалик при выпечке не развернулся.
Начинка при выпечке ведёт себя просто образцово-показательно — не вытекает и не расползается. Поэтому рогалики можно особо не защипывать.
Разогрейте духовку до 200°С. Выложите рогалики на выстеленный пергаментной бумагой противень и отправьте в духовку минут на 12-15. Рогалики должны слегка зарумяниться.
Горячими посыпьте ванильной сахарной пудрой. И приятного аппетита! http://photokulinar.com/sladkoe/popolnenie-rogatyx/
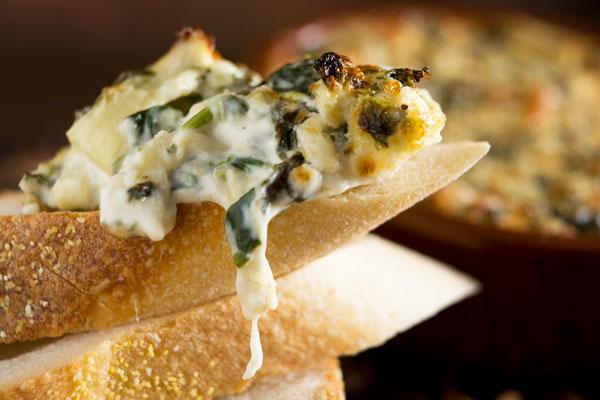
Florentine Artichoke Dip
Ingredients
- 1, 16 oz. package cream cheese
- ½ cup mayo
- 1½ cups freshly grated Parmesan cheese
- 2 teaspoons lemon juice
- 1 teaspoon coarse ground black pepper
- 1, 10 oz. package frozen chopped spinach
- 1 can artichoke hearts, drained and chopped
- 32 cloves of roasted garlic
Preparation
Preheat oven to 375ºF. Mix all ingredients in a bowl until well combined. Transfer to an oven-safe soufflé dish and bake for 20 minutes.Serve hot with toasted baguette slices. http://www.nuggetmarket.com/recipes.php?id=54
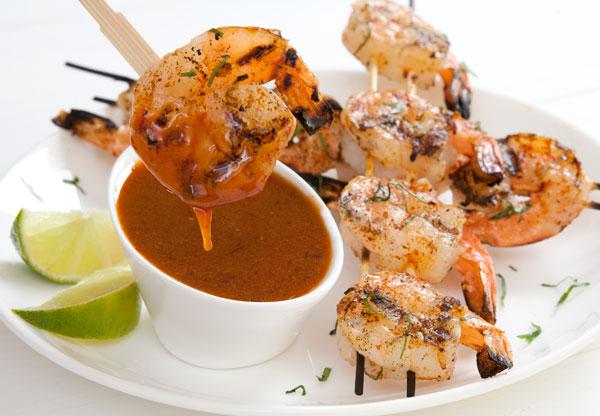
Chipotle-Honey Dipping Sauce
This dip is exactly what it appears to be – fun and simple. While a gourmand exists in us all, there is always equal room for home-style foods. Chipotles may have made an enormous splash on the food scene a number of years ago, yet they still maintain a place in a variety of food styles. Use this dipping sauce for everything from fried chicken tenders to grilled prawns!
Ingredients
- 2-3 chipotle peppers plus 2 tablespoons adobo sauce (the sauce in which chipotle peppers are packed)
- 1 cup raw, local honey
- 1 teaspoon cumin seed, toasted
- Kosher or sea salt and cracked black pepper to taste
Preparation
Place chipotle peppers and sauce in a food processor and process until a smooth paste is reached. Scrape sides of bowl with spatula several times to aid the puree process. Slowly add honey and cumin seeds; process until completely mixed. Season the dip to taste with salt and pepper.Chipotle-Honey Dip will keep up to 3 weeks in the refrigerator. Adjust "heat" of dip by adding or reducing the number of chilies used or by increasing the quantity of honey. http://www.nuggetmarket.com/recipes.php?id=72
Sweetheart Sundae for Two
Ingredients
- 1 square Nugget Market's FudgeFrosted Brownie
- 1 pint Ciao Bella Vanilla Bean Gelato
- ¼ cup Fran's Pure Raspberry Sauce
- ¼ cup Mrs. Richardson's Hot Fudge
Preparation
Use a small knife, preferably a paring knife, to cut the brownie into the shape of a heart.Warm hot fudge sauce in the microwave (lid removed) for 20-30 seconds.
Drizzle fudge sauce evenly across a plate, then place heart-shaped brownie in the center. Top brownie with a generous scoop of vanilla bean gelato. Pour raspberry sauce over the top and serve with two spoons! http://www.nuggetmarket.com/recipes.php?id=227
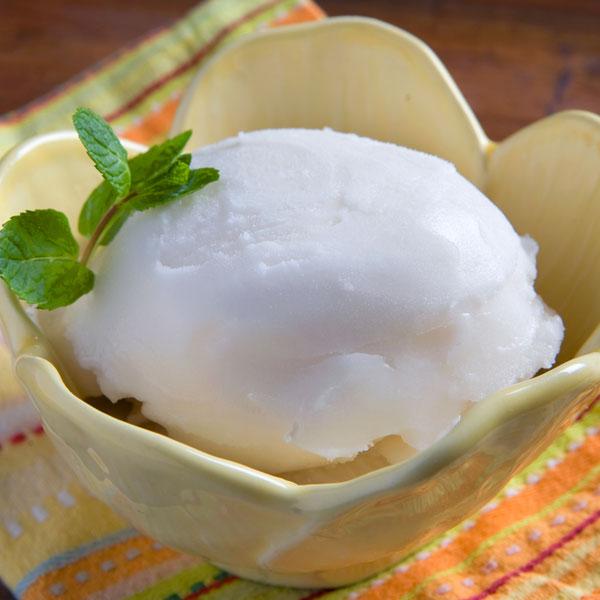
Meyer Lemon Sorbet
Ingredients
- 4 lemons
- 1 stalk lemongrass
- 3 cups water
- 1½ cups granulated sugar
- 1 cup mineral water
Preparation
Zest lemons; set aside. Juice lemons; set aside. Cut and remove top and bottom portions of lemongrass. Slice lemongrass into ⅛-inch to ¼-inch rounds; set aside. Strain reserved lemon juice.Combine water and sugar in a small saucepan and place over medium heat. Whisk sugar and water together until melted and liquid begins to boil. Boil for approximately 1 minute; add lemongrass and lemon zest and boil an additional 1 minute. Remove from heat immediately and let stand for 5-10 minutes.
Strain liquid; discard lemongrass and lemon zest, then add the reserved fresh lemon juice and mineral water into one plastic container. Place syrup mixture in refrigerator and chill for about 1-2 hours.
When syrup is completely chilled, prepare ice cream maker. Layer ice, coarse or rock, until ice reaches the top of the metal insert. Pour syrup into machine and turn it on to begin freezing sorbet. Freezing process will take 25-30 minutes before sorbet reaches the correct consistency. Transfer sorbet immediately into a plastic covered container and place in freezer. Let stand in freezer for a minimum of 3 hours or overnight before serving. http://www.nuggetmarket.com/recipes.php?id=221
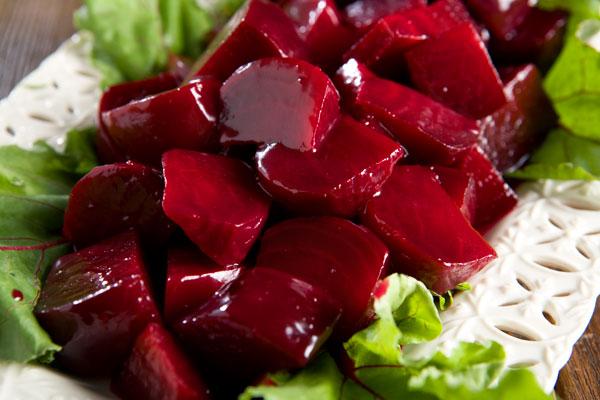
Sweet & Sour Beets
Ingredients
- 12 small red beets
- ½ cup sugar
- 1 tablespoon cornstarch
- ½ teaspoon kosher or sea salt
- 6 cloves
- ¼ cup Vilux Black Currant Vinegar
- ¼ cup Kozlowski Red Raspberry Vinegar
- 1, 3" piece of ginger, sliced into circles
- 2 tablespoons butter
Preparation
Scrub beets clean and trim. Leave root and 1" of stem on beets. Place beets in a pot and cover with water. Bring to a boil, then reduce heat and simmer 30-40 minutes, or until a paring knife can be easily inserted into the body of a beet. Remove from heat; drain and run cold water over beets, gently rubbing off skins. Trim stem and root. Cut into wedges.Combine sugar, cornstarch, salt, cloves and ginger in a heavy saucepan; stir in vinegar.
Cook over medium heat, stirring constantly until thickened and bubbly. Add butter. Strain sauce, discard solids, then pour over beets. Gently toss beets in sauce. Chill completely and serve. Sweet & Sour Beets may be made up to 2 days prior to serving.
Orange Macadamia Nut Fried Rice
Ingredients
- 2 cups long-grain white rice
- 3 navel oranges
- 2-inch piece fresh ginger, peeled and grated
- 1 pinch kosher or sea salt
- 3 tablespoons vegetable oil
- 1 bunch scallions, diced
- 1 red bell pepper, diced
- 1 bunch of cilantro, chopped
- 2 cups fresh pineapple, cut into tidbits; or 1, 14 oz. can pineapple tidbits, drained
- 1½ cups macadamia nuts
- 3 tablespoons San-J Reduced-Sodium Tamari premium soy sauce
- dash of Tabasco sauce
Preparation
Zest all 3 naval oranges and set aside. Juice the oranges and add water to orange juice to equal 3¾ cups liquid. Pour orange-water liquid into a saucepot and add half of chopped orange zest, half of grated ginger and salt. Bring to boil and add rice. Reduce heat to low and simmer until liquid is absorbed, about 20 minutes. Transfer cooked rice to a shallow dish and place in refrigerator to chill completely, about 2 hours.Place macadamia nuts in a 350°F oven for 5-7 minutes or until they are lightly toasted. Chop nuts rough and set aside.
When rice has cooled, add vegetable oil to a preheated wok or skillet (high heat). To skillet, add scallions, red bell pepper and the rest of the grated ginger and orange zest – stir-fry until bell pepper is tender, 1-2 minutes.
Add the rice to wok with other vegetables and stir-fry for a few minutes. Then mix in the macadamia nuts, pineapple tidbits and ⅔ of cilantro.
Add Tamari and Tabasco to rice and stir to combine. Add more Tamari and Tabasco to taste. Garnish rice with remaining ⅓ of cilantro and serve. http://www.nuggetmarket.com/recipes.php?id=82
Fuji Apple Slaw
Ingredients
- 1 head Napa cabbage shredded
- ½ red onion jullienne
- 2 Fuji apples jullienne
- 1 ½ teaspoons celery seed
- 1 tablespoon Dijon mustard
- ¼ cup cider vinegar
- 1 large shallot brunoise
- ¾ cup extra virgin olive oil
- 1 teaspoon honey
Preparation
Mince shallot and place in a bowl with vinegar, honey, mustard, and salt.Chop the rest of your vegetables.
When finished, slowly whisk in the olive oil to the shallots, vinegar, and mustard to emulsify. Dress the Napa cabbage and apples with the vinaigrette, then add the celery seed. Allow to marry in the refrigerator for 30 minutes before serving.
Serve with the "Apple Hill" Stuffed Pork Loin, chicken, or with any hearty flavored fish. http://www.nuggetmarket.com/recipes.php?id=273
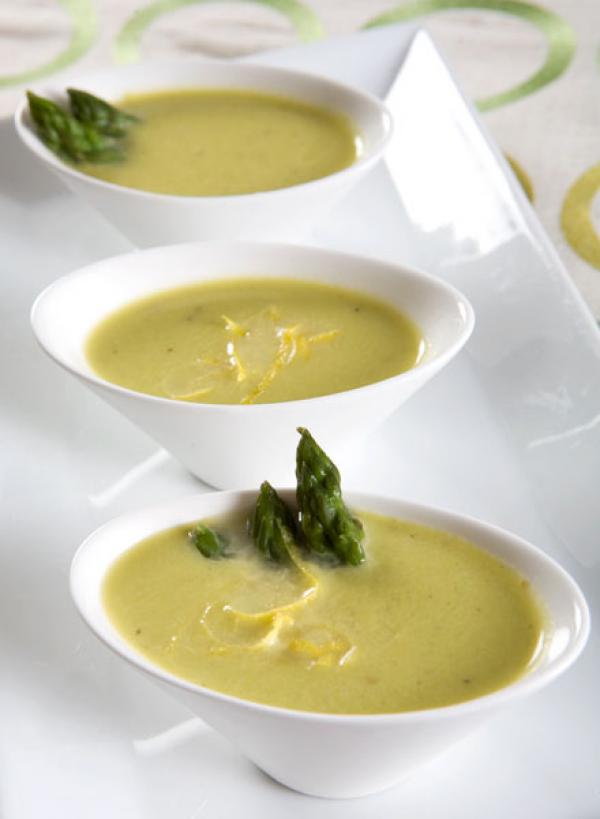
Asparagus Soup
Hate to throw away the asparagus ends after you've trimmed them? Turn them into soup! Asparagus ends can be a little fibrous though, so make sure you give them a good long turn in the blender.
Ingredients
- 2 tablespoons extra-virgin olive oil
- 1¼ lbs. asparagus
- ½ lb. Yukon gold potatoes
- 4 shallots, diced
- 1 teaspoon garlic, minced
- 2 quarts water
- 1 cup heavy cream
- 1 lemon, zested and juiced
- Pinch of kosher or sea salt
Preparation
Preheat a large saucepan to medium-low. Add your oil and slowly brown the minced garlic. When the edges of the garlic just start to brown, add your shallots and a pinch of salt; when the shallots turn translucent, add the water, asparagus and potatoes. Bring to a boil and reduce heat to a simmer. Simmer for 15-20 minutes or until the vegetables are very tender.Strain the mixture and place the vegetables into a blender; with the blender on, slowly add the cream to purée the mixture. Turn the heat off and whisk the mixture back into the liquid. Add the lemon juice and season to taste.
This soup can be served warm, or it is great chilled or at room temperature.
Techniques used in this recipe
"Apple Hill" Stuffed Pork Loin with Barsotti's Apple Juice Pan Jus
Ingredients
- 1, 2-lb. pork loin roast
- 1 tablespoon butter
- 2 Granny Smith apples, small dice
- 1 cup dried cherries
- 1 cup Rum
- 1 red onion, jullienned
- 4 large fresh sage leaves, chiffonade
- ¼ cup Panko breadcrumbs
- 2 cups Barsotti's Apple Juice
- 1 cup water
- 1 teaspoon "Better than Bouillon" beef base
Preparation
In a small saucepan over high heat, bring the apple juice to a boil; then lower the heat and simmer to reduce until it has a syrupy consistency. You will have about ¼ cup of liquid left. When done, turn off the heat, add the water and whisk in the beef base. Set aside to cool.While apple juice is reducing, melt butter in a large frypan over medium-high heat. Add the onions and sauté; when the onions start to brown around the edges, turn the heat down to medium-low and caramelize, stirring frequently. When the onions are the color of milk chocolate, add the apples and the dried cherries and take off the heat; then add the Rum. Place back on the heat and cook until almost all of the Rum has boiled away. Add the breadcrumbs and sage; stir in and allow to cool.
Using your longest, sharpest knife, butterfly the pork loin by starting at the bottom of the roast and cutting lengthwise about 1/2 inch from the cutting board. Pull the roast away from your knife, opening it like a book. Repeat this process by starting at the end of your last incision, be careful not to cut all the way through the meat. You should have a relatively flat piece of meat, but if it is not you can pound it to a uniform thickness with a meat mallet.
When the apple-and-onion mixture has cooled, stuff the pork loin with the mixture, pressing it flat on the entire surface of the pork. Make sure to leave about a ½-inch border with no stuffing; otherwise when you roll it, it will come out the sides. Roll the roast into a jelly-roll shape. Tie it with butchers twine.
Preheat the oven to 350°F.
Preheat a large frypan to medium-high heat.
Brown the roast in canola oil on three sides for 3-5 minutes each or until the roast is a nice golden-brown. Place on the unseared side and slide the whole pan into the oven. Roast for 35-40 minutes or until the internal temperature reaches 140-145°F. Remove from the pan and allow it to rest while you complete the pan jus.
Place the pan on medium-heat and deglaze with the apple cider mixture; make sure to scrape all the brown bits off the bottom of the pan. Slice the roast and serve with a healthy portion of the jus and the Fuji Apple Slaw. http://www.nuggetmarket.com/recipes.php?id=272
White Barbecue Sauce
In Alabama Barbecue traditional Sauce uses Mayonnaise as its base rather than tomato sauce, vinegar, or any of the other more typical barbecue sauce bases. It is clearly a region favorite. Bob Gibson of Decatur, Alabama is credited with the invention the white sauce back in 1925.
Friends and family were first treated to this secret-recipe sauce on chicken and pork at weekend barbecues where boards were nailed to trees for tables. Today, this famous mayonnaise-based condiment is traditionally employed to baste chicken, seafood and pork.
White BBQ Sauce is as synonymous with the state with Alabama as the legendary “BAMA” football program. White BBQ Sauce’s intriguing flavor complements salads and is a superb baste for chicken, pork and turkey. You can also use White Sauce as an ingredient to add an extra kick to your favorite slaw or potato salad. However, because the racks of your local grocer are dominated by many incarnations of tomato-based sauces and white bbq sauce is such a regional anomaly, most people outside Alabama have not tested this concoction of flavor.
Like many barbecue sauces you want to apply this only at the very end of your grilling or smoking. It will breakdown and separate if it is heated too long. Use this sauce on chicken and turkey. It is also good on pork. Alabama White Barbecue Sauce has a tangy flavor that is a great addition to grilled foods.
White BBQ Sauce makes a unique experience. Use this recipe when grilling chicken; brush lightly over the chicken during the last few minutes of grilling. This sauce is also great for dipping; keep some sauce aside for passing at the table.
White BBQ Sauce Recipe
Ingredients:
1 quart mayonnaise
3/4 quart apple cider vinegar
1/2 cup corn syrup
1/4 tablespoon cayenne pepper
Prepared horseradish
Lemon juice
Salt and freshly ground black pepper
Directions:
Place all ingredients in a very large blender or food processor. Blend for 1 minute, or until thoroughly mixed and sauce is smooth. Pour sauce into a large container or bowl. http://barbecue-tips.com/white-barbecue-sauce/#more-84
Healthy Experience
There are countless ways you can turn your grilling not only into a flavorful and enjoyable way to cook, but there are also many healthy and tasty alternatives. Like anything else in life, what you put on your grill is a choice.
Grilling healthy first means that you have decided to eat healthy. Cooking on a grill can be a great way to reduce fats on while adding wonderful flavor however we must also be careful when grilling as there can be certain risks if precautions are not taken. Eating healthy always begins with choosing healthy foods that are low in fat and using marinates to reduce unhealthy caseinogens.
We know that charcoal grilling can produce carcinogenic smoke from the high temperature cooking of foods containing fat and protein. This can produce unhealthy chemical changes in the outer layers of flesh foods. To avoid these dangerous chemical formations we must avoid inhaling the smoke and avoid the black char on the outside of charcoal cooked food caused by high heat and/or overcooking. It is also advised that any lighter fluid or self-lighting packages be avoided as they can also add toxic chemicals directly into your food. Instead, use a starter chimney and newspaper to get your charcoal lit. While this method may initially take a few more minutes, in the long run it’s faster and healthier. The use of marinades can also help greatly lower caseinogens in food. By using a marinade your food will not only take on extra flavor but even a simple marinade consisting of olive oil and a citrus juice can reduce the harmful chemicals by as much as 99%. A marinade will also assist in tenderizing and enhancing your food’s natural flavors.
There has been a lot of talk about grilling and the risk of cancer. While the risk is real and this should be kept in mind, there are some simple things you can do to greatly reduce the risk of cancer caused by grilling. The harmful chemicals that can form are created by putting food, primarily meats, under intense heat and flame. These are cancer forming agents however by taking a few simple precautions you can greatly reduce and even eliminate the risks. Grilling isn’t the only cooking method that causes these agents so there is no reason to give up on your grill. If done right, grilling is one of the healthiest methods of cooking.
To reduce the risks follow these basic tips:
• Trim excess fats from all foods. The fats are the main contributors to harmful chemicals so avoid fatty foods as much as possible.
• Using marinades based on olive oils and citrus juices with greatly help reduce the risks.
• Maintain a clean grill. This will also help reduce harmful cancer forming chemicals.
• Avoid letting your grill flare-up. Extreme heat and flame will also increase risk.
• Do not overcook foods. If you do accidentally char your food simply scrape or cut that portion off. http://barbecue-tips.com/healthy-experience/#more-68
Perfect BBQ Ribs
Most master grillers prepare their ribs first, before cooking them on a charcoal grill. This is why some grillers cook perfect ribs every time. Usually at a BBQ event, guests see the cook placing the ribs on the grill, never knowing that work was done beforehand to get the ribs ready. Those new to grilling assume that the cook is just brushing sauce on the ribs, and then cooking them until done directly on the grill and this isn’t always so.
If you are grilling BBQ ribs on a regular charcoal grill, then you’re probably frustrated when you find that your ribs are tough instead of “meat falling off the bones” tender. If this is the case, then you can learn how to barbeque perfect ribs easily by preparing your ribs properly in advance, before you ever place them on your grill.
To prepare your ribs, first bring a large pot of water to a boil. You should do this the day before your BBQ event or dinner. Add a bit of salt to the water, and then bring it down to a simmer. Add your ribs, cover and simmer them for 1 to 2 hours and then carefully remove them from the pot. Your ribs should be tender and juicy now, but you shouldn’t place them on the grill just yet.
Place them in a large bowl, add your BBQ sauce, cover and refrigerate this overnight. This provides ample time for the ribs to marinate in the sauce, to produce that rich BBQ flavor that everyone loves so well.
The next day, light your grill and let the coals die down to warm glowing embers. You should never BBQ your ribs over an open flame; this can burn the sauce and ruin the flavor of your BBQ ribs.
Once the flames have died down, brush some more sauce on your ribs and place them directly on the grill. Cook for 10 minutes, brush some more sauce on the top of the ribs, turn and cook the other side for 10 minutes. Continue cooking the ribs in this fashion until they are fully done, turning your BBQ ribs every 10 minutes while adding fresh sauce at every turn.
Once your ribs are done, place them on a serving platter and serve while they are still hot. Your guests will go crazy over your delicious, juicy and tender ribs. This is the proper way to cook perfect BBQ ribs. If you just throw the ribs on a grill, without preparing them first, then your ribs will be very tough and not very good no matter what type of sauce is used.
BBQ sauce is used to add flavor, not to cover up inferior cooking. Don’t you owe it to yourself and to your dinner guests to go that extra mile, ensuring that your ribs are not only tasty, but also mouth watering tender? You’ll be known as the best BBQ rib griller in your area. http://barbecue-tips.com/perfect-bbq-ribs/#more-64
"Обед в условиях кризиса..."
Ну ладно,торты пирогами,но ведь и я не Мария-Антуанетта...с ее xлебом и пирожными...наверное поетому и голова пока на месте...:)) А так как она(голова) еше..и с ушами...,то сегодня мы будем ...вешать лапшу на... :))) А еше более доxодчиво...
Моя мама любила повторять,что у хорошей хозяйки из одной курицы может получиться настояший обед..из нескольких блюд:суп,салат икомпот основное блюдо..и ето понятно...родители наши(да и мы..с ними) жили в те времена,когда из продуктов в магазине было "макароны и...еше раз макароны"(наверное хотели сделать из нас итальянцев, забывая,что советского человека...ничем испортить нельзя:)))..А если вам в советском "Гастрономе доставалась"синяя птица",т.б курица...,то вы себя считали везунчиком словившим "птицу счастья" завтрашнего дня обеда..Сегодня ,при присутствии большого выбора продуктов в магазине,но так же при наличии международного кризиса...ето блюдо вполне может называться "Пир во время чумы" "Обед в кризисные времена",потому что для того чтобы его приготовить сначала надо сварить бульон с курицей(бульона получится много,поетому часть можно заморозить...до следушего супа или для приправ к другим блюдам...) Из бульона можно сварить чудесный супчик(тут на ваше усмотрение),а из курицы приготовить блюдо под названием:
"Курица в восточном стиле с яичной лапшой "
( Read more... )
Моя мама любила повторять,что у хорошей хозяйки из одной курицы может получиться настояший обед..из нескольких блюд:суп,салат и
"Курица в восточном стиле с яичной лапшой "
( Read more... )
Хачапури быстрые
Этот рецепт я, уже, в своем журнале описывала,но..но почему хорошее не должно повториться?Почему,я вас спрашиваю..?Вот то-то и оно,ведь все помнят,что "повторение -мать хорошего аппетита ученuя",да и когда холодно..хочется чего-нибудь погорячее..чем 1 листик салата помноженный на еше один..листик салата:))) Поетому сегодня у нас на ужин или на завтрак..кому как больше нравится..главное,что очень вкусное и несложное в приготовлении блюдо:
Хачапури быстрые
( Read more... )
Хачапури быстрые
( Read more... )
"Клубничный тарт с кремом из белого шоколада"
Сегодня я не буду долго "ля-ля -фа",т.б разбрасываться словами..Я сегодня "сурьёзно" настроена...Скажу только ...если у вас есть клубника,то...не теряйте время зря-на кухню "вперед и с песней"..Ну а если у вас клубника появится только через несколько месяцев...то занесите етот рецепт в "память"(и не только свою:)))),потому что...ето не просто изыскано и вкусно,ето вкусно до неприличия:)))
"Клубничный тарт с кремом из белого шоколада"
( Read more... )
"Клубничный тарт с кремом из белого шоколада"
( Read more... )
Печенье "Пальмовые листья"
Не знаю,как так получилось,но ето печенье у моего мужа самое любимое...Он даже научился его печь сам.....Теперь он умеет делать 3 блюда:яичницу,утренние хлопья с молоком:))) и ето печенье.Так что можете себе представить о каком уровне сложности выпечки идет речь...
Ага..правильно догадались-ето уровеньдоисторический даже дочайниковый,с которым справится даже муж..не говоря уже о ребенке:)))Ето печенье еше одна "палочка-выручалочка: для будних дней..или для гостей,которые неожиданно и,именно, в тот день,когда вы разморозили слоеное тесто.."нарисовались у вас на пороге(уверена..им кто-то "настучал" о том,что вы собираетесь печь :)))
Ето печенье,как и само слоеное тесто пришло к нам из Франции..а там знают толк в еде:)Итак:
Печенье "Пальмовые листья"
(Palmieres)
Почему тaк называется...да потому что после выпечки оно где-то и кому-то напоминает пальмовые листья..Значит будем себе их и представлять:)))
( Read more... )
Ага..правильно догадались-ето уровень
Ето печенье,как и само слоеное тесто пришло к нам из Франции..а там знают толк в еде:)Итак:
Печенье "Пальмовые листья"
(Palmieres)
Почему тaк называется...да потому что после выпечки оно где-то и кому-то напоминает пальмовые листья..Значит будем себе их и представлять:)))
( Read more... )
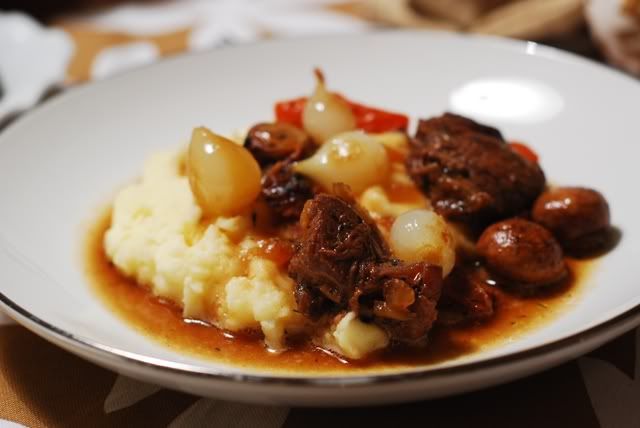
Beef Bourguignonne
Холодает у нас. Поэтому салатами одними не проживешь. Хотелось чего то горячего, сытного! Давно уже собиралась приготовить какое то рагу, но как то едоков все не хватало, а ведь на 1-2х человек его не приготовишь, больше мороки. А тут пригласили друзей на ужин, вот я и решилась. Чесно говоря переживала, не знала получится ли или нет, боялась что мясо будет жестким или не вкусным. Ошибалась! все получилось на ура! Превзошло все мои ожидания! Оказалось еще ко всему же это не так то и сложно готовить! вот теперь по такой схеме буду и другие рагу готовить... с другими добавками.
Но тут поговорим о классике. О не произносимом для не французскоговорящих людей
Beef Bourguignonne
(эт говядина по бургундски что ли?)
( Read more... )( Read more... )
Но тут поговорим о классике. О не произносимом для не французскоговорящих людей
Beef Bourguignonne
(эт говядина по бургундски что ли?)
( Read more... )( Read more... )
Вареники с редькой
Спасибо queenofswords4 за идею вареников с редькой. Что вам сказать? Это таааааак вкусно!
Ну тесто уже все умеют делать. Для начинки редьку (горькую, черную) натереть на терке посыпать сыром, полить майонезом и запечь до красивой корочки, обжарить на растительном масле (как капусту). Ну в общем то и все. Посолить поперчить. Можно добавить лук, можно не добавлять. Редька, как оказалось, впитывает в себя много масла, поэтому с ним поосторожнее, даже если будет казаться что масла не хватает, лучше не добавлять, просто почаще помешивать.
Я сделала половину просто с редькой, половину с редькой и картошкой.
В общем у меня теперь есть еще одна любимая начинка. и совсем она не вишневая :)
http://marikan.livejournal.com/192124.html#cutid1
Ну тесто уже все умеют делать. Для начинки редьку (горькую, черную) натереть на терке
Я сделала половину просто с редькой, половину с редькой и картошкой.
В общем у меня теперь есть еще одна любимая начинка. и совсем она не вишневая :)
http://marikan.livejournal.com/192124.html#cutid1