Some of the visitors to my blog who came for the Gumpaste Tulip Tutorial have asked how to make a frilly tulip. For the red tulip featured in my tutorial I used the cutter on the bottom left with the quarter inside (to show the size). For this white tulip I used the smaller cutter on the top left. After the paste was cut I used the scalloped cutter on the top of the petal and a little way down the sides. Then I used the ball tool and frilled them well. I followed the same steps as in the other tutorial, taping the centre stamens together, then the inside three smaller petals, and lastly the outside larger petals, one at a time to keep them in place. Then it was dusted with pale green on the edges of the petals and at the base, and after that I steamed the flower.
Labels
"Погребок"- заготовки на зиму(canning)
(82)
Afternoon Tea-recipes and tradtions
(41)
All about Sushi rolls and more
(2)
appetizers
(61)
Baby Shower
(2)
Barbecue
(45)
Beauty
(29)
Bread and pizza
(67)
Breakfast Sunday Brunch
(18)
Bridal Shower and Wedding
(8)
burgers sandviches and toasts
(22)
Cake decorating and gum paste flowers
(144)
Cake pops and balls
(35)
cakes
(197)
canning
(31)
cheesecakes
(31)
Chocolate
(38)
Christmas
(102)
Coffee and Latte Art
(22)
Coffee cakes pies sweet breads
(74)
cookies
(226)
Cupcake Muffin Пирожное
(62)
Decorated cookies tutorials
(48)
Decorating Easter Eggs
(19)
Dessert
(46)
Easter
(52)
Easter and Spring
(29)
eggplants
(3)
eggs
(11)
Father's Day
(4)
Fish and seafood
(30)
French cooking
(14)
fresh fruits
(6)
gingerbread
(68)
Healthy Eating
(32)
Homemade gifts
(3)
Hапитки
(30)
Italian food
(39)
jams and jellies
(33)
Jello salads and desserts
(17)
Kашки
(4)
Kонфеты и другие сладости
(42)
Kремы-Buttercream-Frosting
(4)
Kрымские блюда
(14)
Main course
(36)
Main Dish
(53)
meringues зефир marshmallow pastilage
(40)
Mexican-Spanish food
(34)
Mothers Day
(7)
Mяско
(59)
Nutella
(5)
Olive Garden recipes
(3)
oranges
(3)
Oriental food
(8)
Oформление салатов
(41)
Pasta
(16)
plums
(2)
Potluck
(6)
Poultry
(31)
pumpkin
(19)
Pецепты Джейми Оливера
(5)
Pецепты Сталика Ханкишиева
(37)
Quinoa
(5)
Risotto Jambalaya Плов Paella
(27)
salads
(123)
Sauces Dips and Spreads
(38)
Saving money in the kitchen
(4)
Side Dish- гарнир
(15)
Slow-Cooker
(9)
soups
(105)
Summer recipes
(12)
Table setting etiquette(Сервировка стола)
(67)
Tagine-cuisine of Morocco
(13)
Thanksgiving and Fall
(46)
Tатарская кухня
(6)
Tесто
(17)
Valentines Day
(36)
Video-рецепты
(20)
Блины блинчики и оладушки
(44)
блюда в горшочках
(23)
Блюда из курицы
(60)
Блюда из теста
(56)
булочки
(103)
Вкусности из детства
(63)
Вкусные местечки-Sweet places
(7)
Детский праздник
(29)
Заготовки-полуфабрикаты
(44)
заливное и холодец
(13)
Запеканки и омлеты
(11)
история блюд и кулинарные истории
(24)
Котлеты Тефтели Голубцы и Перчики
(58)
Мороженое-Ice Cream
(15)
овощные заготовки
(18)
пирожки чебуреки беляши и т.д.
(42)
Пляцок
(2)
рулеты мясные и овощные
(36)
Сосиски и домашние колбаски
(26)
Старинные русские рецепты
(38)
Творожная выпечка
(13)
Узбекская кухня и Среднеазиатская
(66)
Хворост Крепли вергуны Пончики
(25)
Saturday, March 19, 2011
A Penguin Tutorial
What a day I've had with these cute little guys! Wednesday afternoons are my sugar days with my friend Verdie. Today our mission was a flock of penguins for my grandson's birthday cake in ten days time. As we were experimenting with the little creatures I took photos, so it is going to be a tutorial of sorts. I will start with the finished flock.
To start, using gumpaste or a mixture of gumpaste and fondant, or fondant with some tylose or gumtrag, measure some pieces of white paste about 15 grams each for the bodies.

Form them into the shape of the body, as above and push a toothpick into it to hold the head later.
Next, using black paste, make pieces 4 grams for the head and roll into balls.
Next, make the eyes and beaks. For the eyes, roll white paste very thinly and cut circles with a #6 piping tip. The little circle will be the cornea. Cut the same out of black paste and divide it in two, make a ball and flatten it for the pupil. Stick in place on the head. For the beak, cut a small square, I had to trim it smaller than the cutter below. Press with a pin to fold it in half. Press the pin flat into the head to make a small indentation. Brush a little water into the indent and gently push in the beak.


Cut out the wings and feet from black paste using small heart cutters for the feet, and an oval cutter for the wings. You may have to trim the hearts to fit. The oval shape gets cut in half, and it's glued with the rounded side to the front.
Make a small cone of coloured paste and work with a pointed modelling stick to create the toque.
Push the head onto the toothpick, adding a little gum glue to keep it in place. Then glue the toque in place.
Now, aren't they just the cutest little guys!!! If you make the penguins for your own cake, I'd love to see the finished result. Leave me a message please! My finished cake is posted here on December 8th. Click on "penguins" under Labels below. http://dianesdecoratingdiary.blogspot.com/2008/11/penguin-tutorial.html
To start, using gumpaste or a mixture of gumpaste and fondant, or fondant with some tylose or gumtrag, measure some pieces of white paste about 15 grams each for the bodies.

Form them into the shape of the body, as above and push a toothpick into it to hold the head later.

Next, using black paste, make pieces 4 grams for the head and roll into balls.
Next, make the eyes and beaks. For the eyes, roll white paste very thinly and cut circles with a #6 piping tip. The little circle will be the cornea. Cut the same out of black paste and divide it in two, make a ball and flatten it for the pupil. Stick in place on the head. For the beak, cut a small square, I had to trim it smaller than the cutter below. Press with a pin to fold it in half. Press the pin flat into the head to make a small indentation. Brush a little water into the indent and gently push in the beak. 

Cut out the wings and feet from black paste using small heart cutters for the feet, and an oval cutter for the wings. You may have to trim the hearts to fit. The oval shape gets cut in half, and it's glued with the rounded side to the front.
Make a small cone of coloured paste and work with a pointed modelling stick to create the toque.
Push the head onto the toothpick, adding a little gum glue to keep it in place. Then glue the toque in place.
Now, aren't they just the cutest little guys!!! If you make the penguins for your own cake, I'd love to see the finished result. Leave me a message please! My finished cake is posted here on December 8th. Click on "penguins" under Labels below. http://dianesdecoratingdiary.blogspot.com/2008/11/penguin-tutorial.htmlGumpaste Tulip Tutorial
Finally! The tulip tutorial. The petals, pistil and stamens need to be in proportion to each other. For the petals I am using an oval cutter 2 1/2" long by 1 1/4" wide. The pistil starts at the base of the petals and is about half the height of the petal. The stamens are a little shorter than the pistil and are bent away from it. A real tulip below.
Next I dusted the petals with a slightly darker red, just enough to bring out the veins. I also brushed a little black at the base. It's easier to dust before the tulip is assembled.
Use green florist tape to tape the six stamens to the pistil;
I rolled out a large piece of green paste and cut out the leaves freehand. You should leave a thicker piece from the base of the leaf about one third of the way up the middle to hold a wire. I also veined the leaves with my yellow rolling cutter, and the edge of a knife. Just don't press hard enough to thin the paste. Dry on crinkled tinfoil to give the leaves some movement. Dust and steam. About a quarter of the folks who visit my blog do so by googling "gum paste tulips". I would love to know if you found the tutorial useful.
FRILLY TULIP
Note added 25th Feb. 2010: I have a post on my blog showing how I made a frilly petalled tulip. Click here for the link. http://dianesdecoratingdiary.blogspot.com/2009/01/gumpaste-tulip-tutorial.html
- The stamens. Make 6. Cut six 3" pieces of #32 white covered wire. Bend the wire over about 3/4" as shown in the photo below. Moisten this part with egg white or gum glue and dip in something like corn meal to resemble pollen. (I used a mixture of gelatin powder and yellow petal dust.) Let dry.

- The pistil. Cut a length of #18 covered wire. This will be the actual stem of the tulip. Colour some gum paste a very light green. Moisten the end of the wire and work the paste to cover the top 2 1/2" of the wire. Pinch the top of the paste into three, as in the photo. Leave upright to dry.
This photo is of my oval cutter and the pistil.
- Petals. Make 6, three should be slightly narrower. Colour some gumpaste the shade you want your tulips. Roll out thinly on a grooved board
Turn paste over and cut out petal. Moisten the end of a 4" length of #28 covered wire and push into the raised portion of the petal.
Tool the petal to thin out the top edge.
Vein each petal. I have an Aldeval tulip veiner which works well.
- Make at least one extra large and small petal in case of breakage. So for one tulip make 4 large and 4 small petals. Gently push petals into a dessert spoon and leave to dry at least overnight.
Next I dusted the petals with a slightly darker red, just enough to bring out the veins. I also brushed a little black at the base. It's easier to dust before the tulip is assembled.
Use green florist tape to tape the six stamens to the pistil; - Tape the 3 smaller petals evenly around, to the base of the pistil. Tape each one separately so that they will stay in place and not slide around.
- Tape the 3 larger petals in between the smaller ones evenly around to the base of the pistil;
- You may want to add another one or two lengths of #18 wire to the stem to make it more like a tulip stem which is fairly thick. This is the finished tulip, dusted and steamed.


I rolled out a large piece of green paste and cut out the leaves freehand. You should leave a thicker piece from the base of the leaf about one third of the way up the middle to hold a wire. I also veined the leaves with my yellow rolling cutter, and the edge of a knife. Just don't press hard enough to thin the paste. Dry on crinkled tinfoil to give the leaves some movement. Dust and steam. About a quarter of the folks who visit my blog do so by googling "gum paste tulips". I would love to know if you found the tutorial useful. FRILLY TULIP
Note added 25th Feb. 2010: I have a post on my blog showing how I made a frilly petalled tulip. Click here for the link. http://dianesdecoratingdiary.blogspot.com/2009/01/gumpaste-tulip-tutorial.html
Gum Paste Gerbera Flower Tutorial
Gum paste gerbera flower is one of my favorite flowers to make. Gerber flowers are amongst my favorites in real life too. They are cute and bright and they just spell F-U-N whenever they are used for an arrangement.
I use a special daisy cutter from PME that makes the process of making gum paste gerber daisies easier. This special cutter not only cuts the shape, it also embosses at the same time.
YOU WILL NEED:gum paste
gum glue
PME Veined Sunflower, Gerbera & Daisy Cutter
CelCakes Sugarcraft Modelling Forms - Shallow
Wilton Fondant Daisy Shape Cut Outs
- use the smallest
small rolling pin
aluminum foil
scissors
metal sieve
small fine brush
cornstarch
petal dust
METHOD
Colour gum paste to desired shade. For this, I made it a bright orange. Gerbera flowers comes in a lot of bright pinks, oranges, yellows and reds. Dust work surface with cornstarch so that gum paste would not stick to it.
Roll out the gum paste to as thin as you can manage.
Using a metal spatula, carefully lift it up and place on top of flower formers. Brush some gum glue in the middle of the flower. Repeat and make another one to place on top of the first. Gently press the flower in the middle. Prop up some of the petals by placing pieces of paper towels or cotton in between petals. Let dry.
Take a small ball of a different color gum paste, in this one I used yellow, and press it against the metal sieve to create texture.
http://www.make-fabulous-cakes.com/gum-paste-gerbera-flower.html
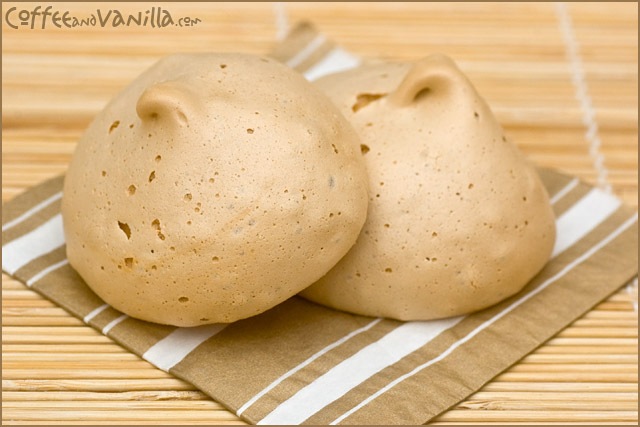
Coffee Meringues
INGREDIENTS
150 ml egg whites (about 5 large ones)
1¼ cup / 250g golden caster sugar (¼ cup / 50g for each egg white)
some instant coffee disolved in a little bit of hot water or coffee flavouring to taste
EQUIPMENT
2 non-stick Telfon sheets
2 baking trays
METHOD
Whisk eggs and sugar using food processor.
Stir in coffee or coffee flavouring and whisk some more till stiff.
Place small portions of mixture with table spoon on baking trays layered with non-stick sheets.
Make sure to leave space between meringues as they will grow.
Bake in preheated oven to 150°C (302°F) for about 45 minutes.
Then turn off the oven and let them cool down inside for about an hour.
Make about 24 large meringues. http://www.coffeeandvanilla.com/?p=1590
How to make a Christmas wreath cookie
This is the first of four special Christmas tutorials for you this Christmas
Today it’s a Christmas wreath cookie decorated with royal icing. You can use your favourite gingerbread or sugar cookie dough for the wreath. Remember to start colouring your icing 1-2 days in advance. That way the colour will have time to “mature” and it can save you from adding too much colour in the end.
This is what I use:Round cookies with holes
Red royal icing (soft consistency)
Green royal icing (soft consistency)
Round tip 2 or 3 for the red icing
Leaf tip medium size for the green icing
Step 1:
Pipe the green royal icing leaves on the cookie. Starting from the inside of the cookie working your way around the wreath. Set aside to dry.
Step 2:
Pipe small red berries randomly on the wreath and set aside to dry completly.
Step 3:
Voila! A nice Christmas wreath cookie for you to enjoy.
Happy Caking
Louise http://www.cakejournal.com/tag/christmas
Subscribe to:
Posts (Atom)