Labels

"Погребок"- заготовки на зиму(canning) (82) Afternoon Tea-recipes and tradtions (41) All about Sushi rolls and more (2) appetizers (61) Baby Shower (2) Barbecue (45) Beauty (29) Bread and pizza (67) Breakfast Sunday Brunch (18) Bridal Shower and Wedding (8) burgers sandviches and toasts (22) Cake decorating and gum paste flowers (144) Cake pops and balls (35) cakes (197) canning (31) cheesecakes (31) Chocolate (38) Christmas (102) Coffee and Latte Art (22) Coffee cakes pies sweet breads (74) cookies (226) Cupcake Muffin Пирожное (62) Decorated cookies tutorials (48) Decorating Easter Eggs (19) Dessert (46) Easter (52) Easter and Spring (29) eggplants (3) eggs (11) Father's Day (4) Fish and seafood (30) French cooking (14) fresh fruits (6) gingerbread (68) Healthy Eating (32) Homemade gifts (3) Hапитки (30) Italian food (39) jams and jellies (33) Jello salads and desserts (17) Kашки (4) Kонфеты и другие сладости (42) Kремы-Buttercream-Frosting (4) Kрымские блюда (14) Main course (36) Main Dish (53) meringues зефир marshmallow pastilage (40) Mexican-Spanish food (34) Mothers Day (7) Mяско (59) Nutella (5) Olive Garden recipes (3) oranges (3) Oriental food (8) Oформление салатов (41) Pasta (16) plums (2) Potluck (6) Poultry (31) pumpkin (19) Pецепты Джейми Оливера (5) Pецепты Сталика Ханкишиева (37) Quinoa (5) Risotto Jambalaya Плов Paella (27) salads (123) Sauces Dips and Spreads (38) Saving money in the kitchen (4) Side Dish- гарнир (15) Slow-Cooker (9) soups (105) Summer recipes (12) Table setting etiquette(Сервировка стола) (67) Tagine-cuisine of Morocco (13) Thanksgiving and Fall (46) Tатарская кухня (6) Tесто (17) Valentines Day (36) Video-рецепты (20) Блины блинчики и оладушки (44) блюда в горшочках (23) Блюда из курицы (60) Блюда из теста (56) булочки (103) Вкусности из детства (63) Вкусные местечки-Sweet places (7) Детский праздник (29) Заготовки-полуфабрикаты (44) заливное и холодец (13) Запеканки и омлеты (11) история блюд и кулинарные истории (24) Котлеты Тефтели Голубцы и Перчики (58) Мороженое-Ice Cream (15) овощные заготовки (18) пирожки чебуреки беляши и т.д. (42) Пляцок (2) рулеты мясные и овощные (36) Сосиски и домашние колбаски (26) Старинные русские рецепты (38) Творожная выпечка (13) Узбекская кухня и Среднеазиатская (66) Хворост Крепли вергуны Пончики (25)

Monday, June 18, 2012

Homemade Nutella


Homemade Nutella1 300x192 Real Food Fast: Homemade NutellaI love nutella straight from the jar and never think twice about buying it. But last winter the LA Times printed a recipe for homemade nutella and I was intrigued. Could something homemade mimic the real thing? The ingredients list is short and the instructions fairly simple so I decided to give it a try. The spread was somewhat more textured then the smooth cream of the store-bought version, but the taste was right on. Making it at home might not replace the ubiquitous grocery store spread but it’s an excellent alternative.

Homemade Chocolate Hazelnut Spread (Homemade Nutella)
adapted from the LA Times
2 cups raw hazelnuts
1/2 cup unsweetened good quality cocoa powder
1 cup powdered sugar
1/2 teaspoon vanilla
1/8 teaspoon salt
3 tablespoons hazelnut oil, more as needed
1. Preheat the oven to 400 degrees. Spread the hazelnuts evenly over a cookie sheet and roast until they darken and become aromatic, about 10 minutes. Transfer the hazelnuts to a damp towel and rub to remove the skins.
2. In a food processor fitted with a blade, grind the hazelnuts to a smooth butter, scraping the sides as needed. About fine minutes.
3. Add the cocoa, sugar, vanilla, salt and oil to the food processor and continue to process until well blended, about 1 minute. The finished spread should have the consistency of creamy peanut butter; if it is too dry, process in a little extra hazelnut oil until the desired consistency is achieved. Remove to a container, cover and refrigerate until needed. Allow the spread to come to room temperature before using, as it thickens considerably when refrigerated. It will keep for at least a week.  http://blogs.babble.com/family-kitchen/2010/11/01/real-food-fast-homemade-nutella/#

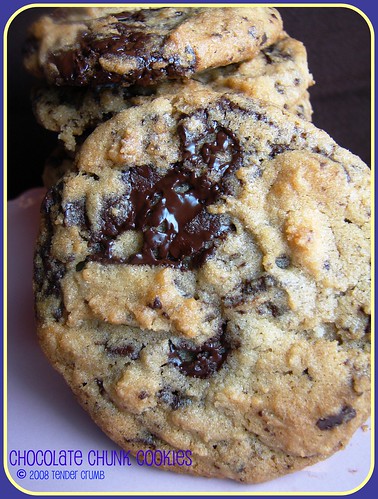
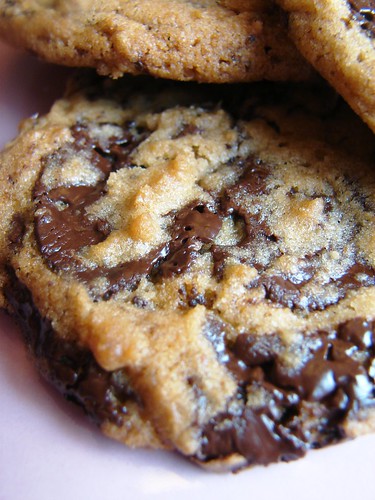
My FAVORITE Chocolate Chip Cookie

I have experimented with countless recipes searching for that perfect chocolate chip cookie. The characteristics of the perfect cookie are a very personal matter, and here are my preferences:

texture: chewy w. medium thickness --- everyone has their preference, and this is mine!

chocolate to cookie ratio: 50/50 --- I really enjoy having a lot of chocolate in every bite

chips vs. chunks: chunks --- I like sizeable pieces of chocolate in my cookie.

type of chocolate: bittersweet --- I like using Valrhona 61% extra bitter

nuts or other add-ins: NONE!!
With the above criteria in mind, this recipe is the closest I've come to experiencing CCC perfection. It's the "not so secret" secret recipe from Jacque Torres, and I'm sure many of you have read about this or already tried this at home. I've been making this recipe countless times, and have found that the following tips make this cookie absolutely perfect:
- Don't substitute the pastry and bread flours w. AP flour. I really believe that the combination of the pastry and bread flours give the cookie a nice slightly crunchy exterior giving way to a really tender middle.
- Hand chopped chocolate chunks, NOT premade chips - I will purchase a hunk of the best bittersweet chocolate that I can afford and hand cut them into chunks. The easiest method to chop a block of chocolate: nuke the block at 50% power for a few seconds, no more. It softens the chocolate just enough. Then take a large kitchen knife and chop away! Your effort will be rewarded with really nice ribbons of melted chocolate throughout the cookie.
- Chill the cookie dough at least 24 hours (I let my dough sit anywhere from 2-3 days) before baking. This is not for taste reasons that were recently written about in an article from NY Times (god forbid we're aging cookie dough...let's leave that for wine and cheese). IMHO, refrigeration makes a difference with the look and texture. I think the dough sets in a way so when you bake the cookies, you end up with the lovely wrinkles and folds as the balls of dough spread and bake. Until I encounter another recipe that will move mountains, I think have finally found my perfect chocolate chip cookie!
I would love to hear about your favorite chocolate chip cookie recipe, so do share! :)

Jacques Torres' Secret Chocolate Chip Cookie Recipe
Makes twenty-six 5-inch cookies or 8 1/2 dozen 1 1/4-inch cookies
Ingredients
1 pound unsalted butter
1 3/4 cups granulated sugar
2 1/4 cups packed light-brown sugar
4 large eggs
3 cups plus 2 tablespoons pastry flour
3 cups bread flour
1 tablespoon salt
2 teaspoons baking powder
2 teaspoons baking soda
1 tablespoon pure vanilla extract
2 pounds bittersweet chocolate, coarsely chopped
Directions
- Preheat oven to 350 degrees. Line baking sheets with parchment paper or nonstick baking mats; set aside.
- In the bowl of an electric mixer fitted with the paddle attachment, cream together butter and sugars.
- Add eggs, one at a time, mixing well after each addition.
- Reduce speed to low and add both flours, baking powder, baking soda, vanilla, and chocolate; mix until well combined.
- Using a 4-ounce scoop for larger cookies or a 1-ounce scoop for smaller cookies, scoop cookie dough onto prepared baking sheets, about 2 inches apart.
- Bake until lightly browned, but still soft, about 20 minutes for larger cookies and about 15 minutes for smaller cookies.
- Cool slightly on baking sheets before transferring to a wire rack to cool completely.  http://tendercrumb.blogspot.com/2008/09/my-favorite-chocolate-chip-cookie.html

Easy Barbecued Ribs

I've never cooked ribs before.  It's something I've left to the pros, like my favourite, favourite, favourite BBQ joint, Boneheads BBQ.  When we were out shopping Thursday night though, there was a pretty good deal on some small packs of pork back ribs, so I decided to give it a go.  Friday morning, I remembered that there was a barbecue rib recipe in my new America's Test Kitchen Slow Cooker Revolution cookbook and I knew it was going to be what I used.  Like most good slow cooker recipes, this one does have a couple extra steps, but I loved that the extra steps were after the slow cooking, not before, because sometimes my cooking skills at 8 AM are not the sharpest.


The original recipe is fairly large and should be made in a large oval slow cooker.  I scaled it down as I only bought 2 lbs of ribs and cooked them in my small round 3.5 quart slow cooker.  It served two rib-loving adults a reasonable portion without making pigs of ourselves (that would be some sort of weird cannibalism wouldn't it?).  I tried the little one with them, but like 99% of the food I cook, I got a happy but firm 'nope!'.  This is one time we were quite happy not to share.  I'll put the full recipe quantities in parenthesis but the recipe is written with my adjustments.  You can use your own homemade barbecue sauce or your favourite store-bought.  Since this was a last minute decision and I was short on time, I did use store bought with fantastic results.  Right now we have a Budweiser BBQ sauce from Costco on the go.  
Easy Barbecued Ribs
1.5 tbsp sweet paprika (3tbsp) (Edited Feb '12 to say I've also used mild smoked paprika with fantastic results)
1 tbsp light brown sugar, lightly packed (2 tbsp)
1/8 tsp cayenne pepper (1/4 tsp)
S&P to taste (about 1 tsp each is what I used)
2 lbs pork (baby) back ribs (6 lbs) - leave the membrane on the ribs to help hold them together
1 cup barbecue sauce (3 cups)
Vegetable oil spray.  
In a small bowl, mix together paprika, brown sugar, cayenne and S&P.  Rub this mixture all over both sides of your ribs well.  Arrange ribs in the slow cooker by standing them up against the wall of the stoneware pot, thicker side down and meaty side against the pot.  Pour barbecue sauce over the ribs, cover and cook for 6-8 hours on low (I did 7 hours and they were perfect).  

Now comes the only stove/oven work involved, we need to reduce the sauce and then brown the ribs under the broiler.  These steps are what turn the ordinary into the extraordinary, so don't you dare skip them even if your ribs already look pretty good.  Once the initial slow cooking is done, very carefully (as they are tennnnderrrrr) remove the ribs to a baking pan which you have lined with foil and put a rack on (like in my photo collage), bone side up.  Set to the side.  Skim any fat that has risen to the top and strain all of the remaining juices from the slow cooker through a mesh strainer into a small saucepan.  Bring to boil and allow to simmer and reduce by about a third, approximately 15 minutes.  Put your oven's broiler on to heat up and make sure that there is an oven rack about 10 inches below the broiler element.  When the broiler is preheated, brush the ribs with sauce and broil for 3 or 4 minutes.  Take them out and very carefully flip them over, brush with sauce and broil again, meat side up, for approximately 9 minutes, taking them out once or twice (I did only once because I forgot) to baste with more sauce.  Serve any remaining sauce on the side with the ribs.  http://www.mmmisformommy.com/2011/09/easy-barbecued-ribs.html

Daring Doughnuts.

bomboloni2.jpg
The October 2010 Daring Bakers challenge was hosted by Lori of Butter Me Up. Lori chose to challenge DBers to make doughnuts. She used several sources for her recipes including Alton Brown, Nancy Silverton, Kate Neumann and Epicurious.
You might as well just declare October 2010 the month of doughnuts. Between my birthday, Lara Ferroni and The Daring Bakers, it’s doughnut central here.
Not that I’m complaining, mind you.
I’m especially not complaining about the amazing challenge that Lori put before us. Between birthday celebrations and family stuff, I only got to try one recipe but it was the one that I most wanted to try: Bomboloni.
Bomboloni are basically the Italian version of doughnut holes. They’re rolled in sugar and often filled with a pastry cream, or other delicious filling like jam or chocolate.
bomboloni1.jpg
Almost as soon as the bomboloni were fried I was pumping them full of Nutella like you wouldn’t believe.
Not only were these doughnuts plump, soft and tasty, they were filled with Nutella.
What more do you want?! 
bomboloni2.jpg
The October 2010 Daring Bakers challenge was hosted by Lori of Butter Me Up. Lori chose to challenge DBers to make doughnuts. She used several sources for her recipes including Alton Brown, Nancy Silverton, Kate Neumann and Epicurious.
You might as well just declare October 2010 the month of doughnuts. Between my birthday, Lara Ferroni and The Daring Bakers, it’s doughnut central here.
Not that I’m complaining, mind you.
I’m especially not complaining about the amazing challenge that Lori put before us. Between birthday celebrations and family stuff, I only got to try one recipe but it was the one that I most wanted to try: Bomboloni.
Bomboloni are basically the Italian version of doughnut holes. They’re rolled in sugar and often filled with a pastry cream, or other delicious filling like jam or chocolate.
bomboloni1.jpg
Almost as soon as the bomboloni were fried I was pumping them full of Nutella like you wouldn’t believe.
Not only were these doughnuts plump, soft and tasty, they were filled with Nutella.
What more do you want?!

Wednesday, June 13, 2012

Little Red Riding Hood Preview

These adorable Red Riding Hood cookies were for my little ones 4th birthday party.  They were inspired by her birthday invitations by Chachke Designs on Etsy. Check out all of her fabulous invitation designs here.  I love their sweet designs.  Check out Little Red and the rest of her woodland crew.
The complete set.

The Big Bad Wolf.

Wolf detail.


Grandma's goodie basket.


Sweet little fawn.


Squirrel detail.


Grandma's house.

http://ohsugareventplanning.blogspot.com/search/label/Little%20Red%20Riding%20Hood

Royal Icing Henna Transfers


My partner in crime, Ryam, from The Inspired Mama, and I are throwing a Princess Jasmine inspired party for her soon-to-be five year old, Samirah.  We're both not too keen on the whole licensed character bit, so Jasmine will be making a minor appearance in the form of some sugar cookies on the dessert table.  So I guess it's really more Arabian Nights than Jasmine we're talking about.  In trying to come up with some fresh ideas, I started playing around with henna tattoos and how I could incorporate them into the dessert table.  That's when I started making these henna royal icing transfers to use as a major-wow cupcake topper.  Below is the surprisingly simple step by step tutorial.  Enjoy!


Start with a line drawing of your design.  I took an image I'd googled then finessed it to fit the shape and size I needed it.


Place a sheet of wax paper over your paper template and start tracing your design using semi-stiff royal icing in your piping bag fitted with a number 1 tip.  Make sure to have some thicker sections for stability.  I went over some lines twice to build them up.  Also be sure to connect all lines to another point of your design so it is more sturdy when peeling off your wax paper.

Keep building and adding on.

You can use a heat gun to speed drying time.


When completely dry (COMPLETELY - no cheating) begin removing your transfers by slowly peeling back a small section from the wax paper.  Don't go too far or the pressure of your fingers are likely to break your work and induce a steady stream of curses.


Using a large offset spatula, slowly start working your design off the wax paper by sliding it under the transfer at the starting point you created by peeling it away from the wax paper. Use a smooth steady motion and watch your spatula to see if it is catching on any of the design elements.  This is easier than you might guess.  I only had two tragedies and one was completely salvaged by putting the largest chunk back on the wax paper and re-piping the missing part.  I just let it dry and removed as described above.


And there you have it.  Beautiful lacy royal icing pieces to use as appliques on cakes, or in my case tall, standing cupcake toppers.  Obviously, you can pipe in any color you like or take it to the next level and give them the Midas touch:


I love this stuff BUT it's kinda pricy ($9.99 at my cake supply store) and does not go as far as I would like.  I chose the spray because I worried about painting with a brush on such a delicate canvas.


How pretty would these be in white used on a pale vintage-inspired lace cake?  Hmmm...  Think I'll have to add that to the "must try" list.
 

Wax Seal Envelope Tutorial

For a Valentine's Day themed birthday party I came up with these simple and pretty valentine envelopes sealed with an edible wax seal.  I had so many inquiries on how to do them I thought I'd put together a quick tutorial.

 Outline a square cookie using a No. 2 tip.


Pipe the envelope flap and corners.


 Flood the side panels and allow to dry.


Next, flood the bottom flap, working the edges to meet up with the dried side sections so they form a nice, clean  seam.  Allow to dry.

Flood the envelope's top flap to meet the side sections in a clean seam, and allow to dry.


Flood a dime-sized circle in the center where the flaps meet and allow to dry.


Pipe a tiny heart in the center starting with two small dots.


Use a toothpick to drag the centers of the dots together to create the bottom point of your heart.

Pipe a circle around the heart using flood-consistency icing (aim for a more centered circle than I managed to do here).  DO NOT allow to dry.

While still wet, work the circle of icing outward in a random, uneven shape to cover the first layer of the yellow icing's edges completely.


Add a few well placed drips and voila!  Wax seal. Easy, peasy, mac-and-cheesy.  http://ohsugareventplanning.blogspot.com/2012/02/wax-seal-envelope-tutorial.html