Labels

"Погребок"- заготовки на зиму(canning) (82) Afternoon Tea-recipes and tradtions (41) All about Sushi rolls and more (2) appetizers (61) Baby Shower (2) Barbecue (45) Beauty (29) Bread and pizza (67) Breakfast Sunday Brunch (18) Bridal Shower and Wedding (8) burgers sandviches and toasts (22) Cake decorating and gum paste flowers (144) Cake pops and balls (35) cakes (197) canning (31) cheesecakes (31) Chocolate (38) Christmas (102) Coffee and Latte Art (22) Coffee cakes pies sweet breads (74) cookies (226) Cupcake Muffin Пирожное (62) Decorated cookies tutorials (48) Decorating Easter Eggs (19) Dessert (46) Easter (52) Easter and Spring (29) eggplants (3) eggs (11) Father's Day (4) Fish and seafood (30) French cooking (14) fresh fruits (6) gingerbread (68) Healthy Eating (32) Homemade gifts (3) Hапитки (30) Italian food (39) jams and jellies (33) Jello salads and desserts (17) Kашки (4) Kонфеты и другие сладости (42) Kремы-Buttercream-Frosting (4) Kрымские блюда (14) Main course (36) Main Dish (53) meringues зефир marshmallow pastilage (40) Mexican-Spanish food (34) Mothers Day (7) Mяско (59) Nutella (5) Olive Garden recipes (3) oranges (3) Oriental food (8) Oформление салатов (41) Pasta (16) plums (2) Potluck (6) Poultry (31) pumpkin (19) Pецепты Джейми Оливера (5) Pецепты Сталика Ханкишиева (37) Quinoa (5) Risotto Jambalaya Плов Paella (27) salads (123) Sauces Dips and Spreads (38) Saving money in the kitchen (4) Side Dish- гарнир (15) Slow-Cooker (9) soups (105) Summer recipes (12) Table setting etiquette(Сервировка стола) (67) Tagine-cuisine of Morocco (13) Thanksgiving and Fall (46) Tатарская кухня (6) Tесто (17) Valentines Day (36) Video-рецепты (20) Блины блинчики и оладушки (44) блюда в горшочках (23) Блюда из курицы (60) Блюда из теста (56) булочки (103) Вкусности из детства (63) Вкусные местечки-Sweet places (7) Детский праздник (29) Заготовки-полуфабрикаты (44) заливное и холодец (13) Запеканки и омлеты (11) история блюд и кулинарные истории (24) Котлеты Тефтели Голубцы и Перчики (58) Мороженое-Ice Cream (15) овощные заготовки (18) пирожки чебуреки беляши и т.д. (42) Пляцок (2) рулеты мясные и овощные (36) Сосиски и домашние колбаски (26) Старинные русские рецепты (38) Творожная выпечка (13) Узбекская кухня и Среднеазиатская (66) Хворост Крепли вергуны Пончики (25)

Thursday, May 5, 2011

How to make a Lily of the Valley in Sugar

    photo

    How to make a Lily of the Valley in Sugar

    Not a good photo but was rushing. Just thought I'd show how a Lily of the Valley posy is made...one of the most simple flowers I think...
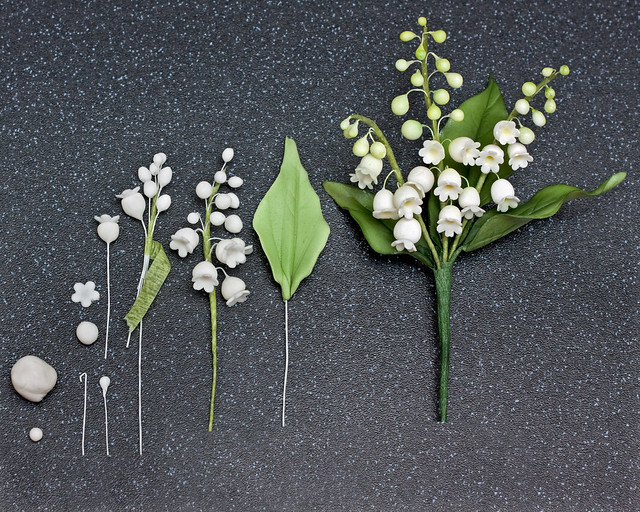
    1. Knead paste til soft & stretchy then roll some tiny balls. Smaller balls make the buds.
    2. Roll some paste thinly til you can see through it and cut out flower shape. soften edges with ball tool. Roll large ball of paste for the body, attach to a glued hook 30 gauge wire. Add flower when attached and indent the centre. This attaches both pieces as well as give the flower a natural center look.
    3. Hook 33 gauge wires for tiny buds and do as above only without adding the flower top. When dry arrange on a larger wire for support, graduating as you go to a latger bud.
    4. Roll out some paste (spruce & leaf green) about 1mm thick. This is quite a fleshly leaf so needs to be thicker than flowers. Leave a central area thicker as to be able to insert a 26 gauge wire. Cut out leaf shape then add a straight unhooked glued wire.
    Then vein and soften edges with a metal ball tool (dresden and bone work the same). Add movement and hang to dry.
    5. When all dry apply dust. I used lemon and cream for flower center, then pearl white to add a tad of sparkle. Foliage, vine, forest & leaf greens to leaf. Remember to add darker dust down central vein and lighter shades to the outer leaf. Steam flowers over kettle for a second, glaze the leaves. Set aside to dry.
    6. When dry assemble......simple :)
    A big thank-you to everyone who has left a thank-you comment of appreciation. If I have helped just one person by showing this tutorial, then I am happy for you :) x  
      photo

      Chocolate Raspberry Torte


      Here’s some happy news to brighten your day: It’s berry season! Raspberries, in particular, are looking plump and juicy right about now. Which is why I love to use them as the finishing touch on this showcase dessert. What we have here is a chocolate layer cake wrapped in a band of solid chocolate and topped with fresh raspberries. The prep and assembly require a bit of effort, no doubt, but it’s well worth it. And if you love the combination of chocolate and raspberries (ummm… how could you not?!), then this is the dessert for you.
      Oh — and while we’re on the subject of the berries, let me just point out my own little food styling misjudgment: In the photo (if you look closely… really closely… zoom in if you have to) you can see that I dusted the berries with a bit of powdered sugar. But… you know what? I don’t really like that idea. Fresh berries are beautiful just as they are. I say, resist the temptation to dust them or drizzle them or do whatever it is you are thinking of doing to them. Just leave them be.
      Before you begin, you might want to read about making the chocolate band enclosure in “Valentine’s Chocolate Ruffle Cake.” It’s messy but fun! And I’m telling you, once you learn how to do this you will want to wrap everything in chocolate.

      Make the Cake Layers:
      1 3/4 cups all-purpose flour
      1 cup cocoa powder
      1 1/2 teaspoons baking soda
      1/4 teaspoon salt
      3/4 cup unsalted butter, room temperature
      2/3 cup granulated sugar
      2/3 cup light brown sugar, packed
      2 large eggs
      2 teaspoons pure vanilla extract
      1 cup buttermilk
      1/2 cup sour cream
      2 tablespoons freshly brewed coffee
      Preheat the oven to 350F. Butter two eight-inch round cake pans and line the bottoms with parchment paper. In a medium bowl, sift together the flour, cocoa, baking soda, and salt.
      In the bowl of an electric mixer fitted with the paddle attachment, cream the butter, granulated sugar, and brown sugar until fully whipped and light in color. (This will take 3-5 minutes.) Add the eggs and vanilla and beat until incorporated. In a separate bowl, whisk together the buttermilk, sour cream, and coffee. With the mixer on low speed, add the flour and buttermilk mixtures to the butter mixture in alternating 1/3 batches, starting with the buttermilk mixture and ending with the flour mixture. Mix the batter until fully blended.
      Divide the batter between the two pans and smooth the tops with a spatula. Bake on the middle rack of the oven for 25-30 minutes, or until the centers spring back when pressed lightly. Cool for 10 minutes on a rack, then remove from pans and allow to finish cooling.
      Make the Buttercream:
      10 ounces bittersweet chocolate
      8 ounces semisweet chocolate
      4 egg whites, at room temperature
      1 cup granulated sugar
      pinch cream of tartar
      1/2 teaspoon salt
      1 pound unsalted butter, cool room temperature
      2 teaspoons instant espresso powder, dissolved in 1 teaspoon water
      1 tablespoon vanilla
      2 tablespoons dark rum (optional)
      Chop the chocolates and melt in a bowl over simmering water until smooth. Allow to cool.
      Mix the egg whites, sugar, cream of tartar, and salt in the bowl of an electric mixer fitted with the whisk. Heat the egg whites in the bowl over simmering water until they are warm to the touch, about 5 minutes. Whisk on high speed for 5 minutes, or until the meringue is cool and holds a stiff peak.
      Add the butter, 1 tablespoon at a time, while beating on medium speed. Scrape down the bowl, add the chocolate, vanilla, espresso, and rum and mix for 1 minute or until the chocolate is completely blended in. If the buttercream seems very soft, allow it to cool and beat it again.
      Assemble the Cake:
      Divide each cake into two layers horizontally using a sharp serrated knife. Attach the bottom layer to an 8-inch cardboard round with a dollop of buttercream. Spread more buttercream over the top of the base layer, then top with another cake layer. Continue until all four cake layers are stacked evenly. Spread buttercream over the top and sides of the cake.
      To wrap the cake in a chocolate band (as pictured) follow the directions here for “Valentine’s Chocolate Ruffle Cake.” Be sure your chocolate band is at least 1/4 inch taller than the height of the finished cake.
      Finish the cake with a layer of fresh raspberries, arranging the berries in concentric circles starting at the outside edge of the cake.
      Note, you may also wish to use raspberries between the cake layers, but only if you are serving the cake on the same day. Otherwise, the berries may break down and become soggy inside the cake. Raspberries are very fragile!  http://www.mirileigh.com/2010/05/chocolate-raspberry-torte/

      Valentine’s Chocolate Ruffle Cake


      [I'm re-posting last year's Valentine's chocolate ruffle cake recipe since it was such a hit. If you didn't try it then, I hope you'll try it now! It's worth the effort... a labor of love for sure.]ruffle cake
      If this isn’t the most romantic looking cake, I don’t know what is. All those ruffles and sex appeal. And that’s just the outside. Slice into it and you’ll find layers upon layers of chocolate genoise, fresh raspberries, and tangy vanilla creme fraiche.
      Happy Valentine’s Day.
      ♥♥♥♥♥♥♥♥♥♥♥♥♥♥♥♥♥♥♥♥♥♥♥♥♥♥♥♥♥♥♥♥♥♥♥♥♥♥♥♥♥♥♥♥♥♥♥♥♥
      Chocolate Ruffle Cake Assembly and Instructions:
      1 eight-inch chocolate cake, baked and divided into three even layers (Genoise has a nice, light texture, but any chocolate cake will do. You can’t really go wrong, so just use your favorite recipe.)
      1/2 cup sugar
      1/2 cup water
      1 tablespoon Frangelico (hazelnut liqueur) or other liqueur of your choice
      2 cups creme fraiche (cold)
      1/2 cup sugar
      1 tablespoon pure vanilla extract
      2 pints fresh raspberries
      1 pound good-quality bittersweet chocolate, chopped into 1-inch pieces.
      Materials:
      Pastry brush
      One 6-inch cardboard round
      One sheet of .005 Mylar (available at art supply stores.)
      One 18-by-13-inch jelly roll pan, washed and dried. Do not use nonstick.
      Make the simple syrup: Combine the sugar and water in a small sauce pan and bring to a simmer, stirring just until the sugar is dissolved. Stir in the liqueur, remove from the heat, and set aside.
      Prepare the creme fraiche filling: In the bowl of a stand mixer, combine the creme fraiche, sugar, and vanilla. Beat on medium speed until the creme fraiche is stiff.
      Assemble the cake: Brush the bottom of the bottom layer of cake with simple syrup, using a pastry brush. Set the cake layer onto the cardboard round, syrup-side down. Brush the top of the same layer with more simple syrup, then spread about 1/2 cup of the whipped creme fraiche over the top. Arrange 8-10 raspberries over the layer, then push them down gently into the creme fraiche. Spread another 1/4 cup of whipped creme fraiche over the tops of the berries. Repeat with the remaining cake layers, filling, and raspberries, ending with a layer of creme fraiche over the top cake layer. Chill the cake in the refrigerator for at least 30 minutes before proceeding.
      Make the chocolate band: Trim a band of Mylar to the exact circumference and about 1/2 inch higher than the assembled cake. Melt 1/4 of the chocolate in a bowl suspended over an inch of simmering water (or in the microwave in 10-second intervals on high) until the chocolate is smooth and spreadable. It should feel warm to the touch, but not hot, so be sure to remove it from the heat just as soon as the last bit of chocolate is melted. Lay the Mylar strip flat on a piece of wax paper and then, working with an offset spatula in one hand and the bowl of melted chocolate in the other, pour and spread the chocolate over the Mylar band, covering it completely and spreading the chocolate all the way over the edges. The layer of melted chocolate should be about 1/8 of an inch thick. Allow it to stiffen ever so slightly while you remove the cake from the refrigerator. Slip your fingers under the band, grip it at either end, and then affix the band to the cake by pressing the chocolate-coated side against the cake all the way around. Transfer the cake to the refrigerator (leaving the Mylar strip intact) once again and refrigerate for another 30 minutes while you make the ruffles.ruffle cake close
      Make the ruffles: Melt the remaining chocolate in the same fashion (using a bowl suspended over an inch of simmering water or in the microwave) and pour it over the back of the jelly roll pan, spreading with an offset spatula to a thickness of about 1/16 inch thick. Transfer the jelly roll pan to the refrigerator for at least 20 minutes. Remove the pan from the refrigerator and slowly bring the chocolate back to room temperature. (The room should be cool and dry, about 68F is ideal.) At the point where the chocolate is malleable but not too soft, fashion ruffles with an offset spatula. Holding the spatula by the handle with one hand and gripping the tip in the other, push the edge of the spatula against the pan, starting at one edge and moving the spatula in an arcing motion. Transfer finished ruffles to a chilled plate or pan, moving them to the refrigerator in batches so they hold their shape.
      Create the ruffle top:Remove the cake from the refrigerator and carefully peel away the Mylar strip. You should have a glossy, solid band of chocolate encasing the entire cake. Arrange the ruffles in concentric circles over the top of the cake starting at the outside edge, setting them into the creme fraiche at a slight angle so they are sticking up and jutting out in all directions. Finish the cake with one perfect raspberry in the center of the ruffles.
      Final step (and this is essential): Eat it with someone you love.   http://www.mirileigh.com/2011/02/v-day2011/

      Mother's Day Gift Ideas 2010


      Mother's Day is just around the corner. Have you figured out what to get mom for Mother's Day yet? If your mom is anything like mine it may be pretty hard to narrow down what she would actually use if you got it for her as a gift for Mother's Day.

      Every year I buy my mom a practical cashmere sweater in a neutral color and she ends up wearing it throughout the year. A few years ago I tried to get her something fun like a waffle maker and it ended up sitting in her kitchen cupboard inside its box unopened. One year I decided to buy her a gift card to her favorite restaurant and she did use it 6 months later to go out with my dad for dinner.

      No matter what you buy her remember it is the thought that counts. Do not get frustrated and wait until the last minute and buy her something random from a store near your work because you know you are seeing her on Mother's Day. Plan ahead.

      Here are some suggestions I have for Mother's Day:

      1.) A gift card to her favorite restaurant near her home.
      2.) Cashmere sweater in a neutral color that you know she will wear.
      3.) Flowers from a florist you have used before so you know their work.
      4.) Take her out to brunch if she lives near you and get her flowers.
      5.) Get her a new bag in a pretty spring color.
      6.) Send her a fresh fruit basket.
      7.) Take her shopping and let her pick something she likes from the store.
      8.) Get her dance lessons or tennis lessons.
      9.) Book a massage and facial for her.

      Don't forget that Mother's Day is not just about your own mother it is also about the mother of your children if you have any. So if you have little ones, help them do something nice for mom on Mother's Day. All moms need to feel appreciated on Mother's Day. They do so much for all of us.

       http://megafruit.blogspot.com/2010_04_01_archive.html