 I generally shy away from calling recipes the best of something. Everyone has different tastes so what I might think is the best chocolate chip cookie or brownie might look very different than someone else’s favorite. But with these candied fruits I am willing to go out on a limb and say these are truly the best. They are bursting with fruit flavor and have the perfect texture, not too firm but not too soft either. I am really glad they turned out so well, because they are a bit of a project to make. I am always up for tackling new cooking challenges, but nothing is more disappointing than making a recipe that is a lot of trouble only to find out that the results are only marginally better than the simpler version. That is not the case with these, they are outstanding and totally worth the effort.
These are made in the traditional french style of candying fruit. Over a period of time the concentration of the sugar syrup the fruit is in is gradually increased so that the liquid in the fruit gradually is replaced by the sugar syrup thereby preserving the fruit. With this method the fruit is never really cooked so it maintains its fresh flavor. There is nothing difficult about the process, it just takes time. Every day for two weeks the syrup is drained off the fruit and heated with additional sugar to increase the concentration. Once this is done the candy will last almost indefinitely.

It is perhaps indicative of my own special brand of craziness that I though it was a good idea to embark on a cooking project that required daily tending when I had a new six week old baby, but I couldn’t help myself. The assortment of citrus in the store was so beautiful I just had to preserve it. Somehow I found myself with a cart full of different citrus fruits, a 25 pound bag of sugar, and I was on my way candied citrus heaven. By far our favorites were the blood oranges and meyer lemons, but they were all good. I can’t wait until next winter to make even more varieties.
On another topic, congratulations to Rivers, the winner of the CSN giveaway. Email me and I will pass along the certificate code.

The Best Candied Citrus
recipe based on the method from Brownie Bites Blog4 oranges, preferably organic (or the equivalent amount of other citrus)
1 kg (2.2 lbs) sugar, plus additional sugar for each day. (you will need a total of 2.4 kg or 5.3 lbs of sugar)
600 g (21.5 oz or approximately 2.75 cups) water
Slice the oranges into thin rounds, no more than 1/4 inch thick. Fill a bowl with ice water and set aside.
Bring a pot of salted water to a boil. Add the sliced oranges to the boiling water (may need to be done in batches depending on the size of your pot). Scoop from the boiling water when the slices float to the top and place into ice water to cool. (They should cook no more than one minute) When cool, drain and remove the slices from the ice water and transfer to a container large enough to hold all of the slices.
Place the sugar and water in a saucepan and bring to a boil, stirring to dissolve the sugar. This step is to just dissolve the sugar (not to cook the syrup). Pour the hot syrup over the orange slices. If the orange slices float, weigh them down to keep them fully submerged. (The easiest way is to place a plate on top of the orange slices and a glass jar of water on top of the plate)
Store the submerged orange slices in a dark cool place, like a cupboard or closet for the duration of the candying. They do not need to be refrigerated.
Each day increase the sugar content of the orange slice sugar solution. Do this by draining off the sugar solution the slices are submerged in, add 100g of sugar, heat the solution to just dissolve the sugar, and pour back over the orange slices. Complete this increase-sugar step daily for two weeks.
Once finished with this process the candied oranges will keep in the solution for a very long time. When ready to use them they can be finished in the following ways.
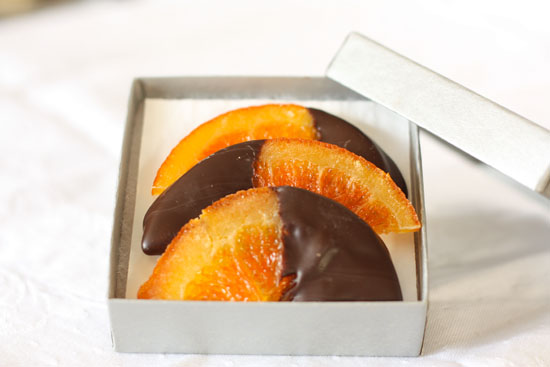
Remove the orange slices from the sugar solution. Arrange in a single layer on a drying rack out at room temperature and let stand until less tacky, 1-2 days (longer if it is very humid). Turn them after one day to make sure they dry evenly. Once dry they can be finished by rolling them in sugar or dipping them in tempered chocolate.
Store finished candies in an air tight container to keep out humidity. They should last at least a month if kept well sealed (and away from nibblers like we have in my house.) http://www.couldntbeparve.com/2011/03/the-best-candied-citrus/
 While I learned a lot in the classrooms at college, almost ten years later what I remember the most are the things I learned from my classmates and friends. We all came from different backgrounds and college was an opportunity for us to share and learn from each other. My wonderful roommate was from just outside of Philadelphia and thought that my education could not be complete if I was not exposed to all kinds of the Philadelphia specialties she grew up with. While I didn’t get to try all of them (it is not really possible to find Kosher scrapple) I did enjoy the Tasty Cakes and Yuengling beer she would bring back with her when she went home. But by far my favorite were the Irish Potatoes, a creamy coconut candy coated in cinnamon to make them resemble potatoes. I had never heard of them before, but I fell in love with them immediately. I looked forward to the annual St Patrick’s Day box her parents would send, that she was generous enough to share with me. It wasn’t until years later that it occurred to me to that I could probably make Irish Potatoes myself and looked up a recipe, only to discover they are one of the quickest easiest candies to make. I have tried dressing them up by dipping them in chocolate, but the original version, rolled in cinnamon, is by far the best. While the original recipe for Irish Potatoes calls for cream cheese (Philadelphia brand of course) this non-dairy (parve) versions leaves nothing to be desired. They are luscious, creamy and spicy, just they way they should be.

