Labels

"Погребок"- заготовки на зиму(canning) (82) Afternoon Tea-recipes and tradtions (41) All about Sushi rolls and more (2) appetizers (61) Baby Shower (2) Barbecue (45) Beauty (29) Bread and pizza (67) Breakfast Sunday Brunch (18) Bridal Shower and Wedding (8) burgers sandviches and toasts (22) Cake decorating and gum paste flowers (144) Cake pops and balls (35) cakes (197) canning (31) cheesecakes (31) Chocolate (38) Christmas (102) Coffee and Latte Art (22) Coffee cakes pies sweet breads (74) cookies (226) Cupcake Muffin Пирожное (62) Decorated cookies tutorials (48) Decorating Easter Eggs (19) Dessert (46) Easter (52) Easter and Spring (29) eggplants (3) eggs (11) Father's Day (4) Fish and seafood (30) French cooking (14) fresh fruits (6) gingerbread (68) Healthy Eating (32) Homemade gifts (3) Hапитки (30) Italian food (39) jams and jellies (33) Jello salads and desserts (17) Kашки (4) Kонфеты и другие сладости (42) Kремы-Buttercream-Frosting (4) Kрымские блюда (14) Main course (36) Main Dish (53) meringues зефир marshmallow pastilage (40) Mexican-Spanish food (34) Mothers Day (7) Mяско (59) Nutella (5) Olive Garden recipes (3) oranges (3) Oriental food (8) Oформление салатов (41) Pasta (16) plums (2) Potluck (6) Poultry (31) pumpkin (19) Pецепты Джейми Оливера (5) Pецепты Сталика Ханкишиева (37) Quinoa (5) Risotto Jambalaya Плов Paella (27) salads (123) Sauces Dips and Spreads (38) Saving money in the kitchen (4) Side Dish- гарнир (15) Slow-Cooker (9) soups (105) Summer recipes (12) Table setting etiquette(Сервировка стола) (67) Tagine-cuisine of Morocco (13) Thanksgiving and Fall (46) Tатарская кухня (6) Tесто (17) Valentines Day (36) Video-рецепты (20) Блины блинчики и оладушки (44) блюда в горшочках (23) Блюда из курицы (60) Блюда из теста (56) булочки (103) Вкусности из детства (63) Вкусные местечки-Sweet places (7) Детский праздник (29) Заготовки-полуфабрикаты (44) заливное и холодец (13) Запеканки и омлеты (11) история блюд и кулинарные истории (24) Котлеты Тефтели Голубцы и Перчики (58) Мороженое-Ice Cream (15) овощные заготовки (18) пирожки чебуреки беляши и т.д. (42) Пляцок (2) рулеты мясные и овощные (36) Сосиски и домашние колбаски (26) Старинные русские рецепты (38) Творожная выпечка (13) Узбекская кухня и Среднеазиатская (66) Хворост Крепли вергуны Пончики (25)

Tuesday, May 8, 2012

Mango Mousse Cake


This is my anniversary cake....which was a couple of days ago. I'm providing a very quick and dirty recipe. Please e-mail me if you have more questions.

Three layers of plain genoise cake, sprayed with simple syrup to keep it moist, topped with chopped strawberries and then layers of mango mousse. For the finishing touch mango miroir glaze is poured on top to give a shiny smooth texture. :)

Genoise Cake
3 Eggs
3 Egg yolks
Pinch of salt
3/4 cup Sugar
1 teaspoon Vanilla
1/2 cup Cake flour
1/4 cup Corn starch

First heat the eggs and sugar on a double boiler till  the sugar dissolves completely. Beat till the mixture doubles in volume and is light and fluffy. Bake in a 9 inch pan at 350 degrees for 25 min or till a knife inserted inside comes out clean. Slice the cake into two layers.

Mango Mousse

1/4 cup Water
2-1/2 teaspoon Gelatin powder
2-1/2 cup Mango puree
1/2 cup Sugar
1 cup Chilled cream

Sprinkle gelatin powder on water and let it rest for 5 minutes. In the meanwhile heat mango puree and sugar over medium heat. After the mixture comes to a boil remove form flame and add in the gelatin. Stir till the gelatin dissolves. Let this cool for 20 minutes. While the mixture is cooling down whip up the cream till it starts to hold its shape. Now gently fold in the mango mixture a little at a time so as not to deflate the whipped cream too much. Keep in the fridge till ready to be used.

Assembling the Cake

Place a layer of cake in a springform pan. Sprinkle chopped strawberries on top. and pour in a 2 inch layer of mousse. Top of the mousse with the second layer of cake. Top of with more chopped berries and another layer of mousse. Place in the fridge for at least 4 hours or over night so that the mousse sets up.

Miroir Glaze

7 ounce Mango juice/ pulp
2-1/2 teaspoon Gelatin
2 ounce water

Soften the gelatin by sprinkling on top of water and let it rest for 5 minutes. Heat the juice till it boils. Remove from heat and add in the gelatin. Wait till this cools down a little. And pour on top of the assembled cake. Chill for a few more hours and your cake is done.

This was the 9 inch cake. The hearts are made with white chocolate.


Same cake, smaller size.


And a bird's eye view for your viewing pleasure.

Eggless No-Bake Mango Cheesecake Recipe


Eggless No-Bake Mango Cheesecake Recipe

I have taken pictures at every stage of this recipe and I am going to force you to look at them. This does not mean this is not an easy recipe. I mean, this is cheesecake you don't need to bake. It really doesn't get easier than that. Round up your ingredients and let's get started.

Eggless No-Bake Mango Cheesecake Recipe

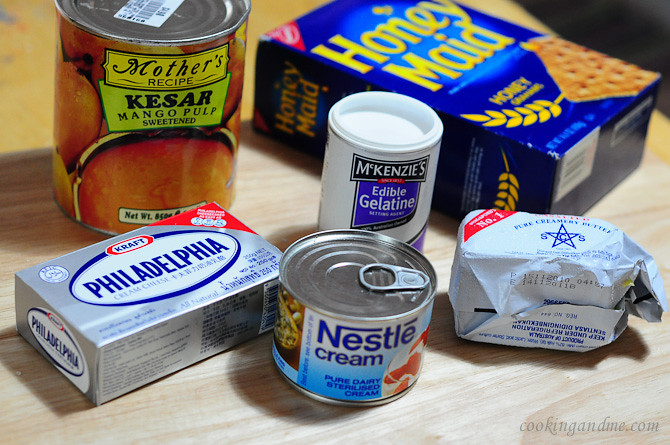
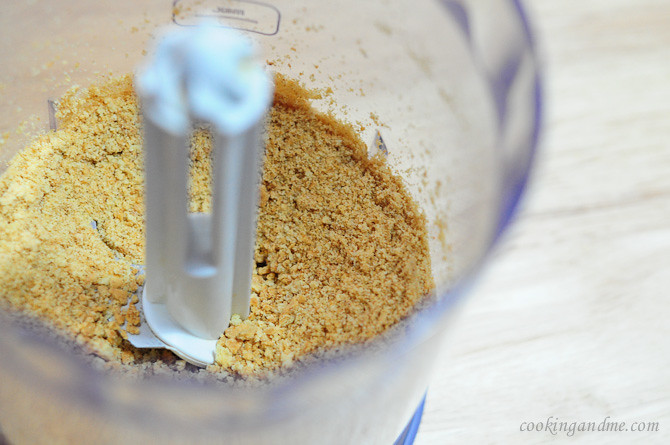
You are going to need graham crackers for the base. I got some from the US because I really really love graham crackers but if you don't have any handy, go with digestive biscuits, marie biscuits, or even Oreos.

Eggless No-Bake Mango Cheesecake Recipe

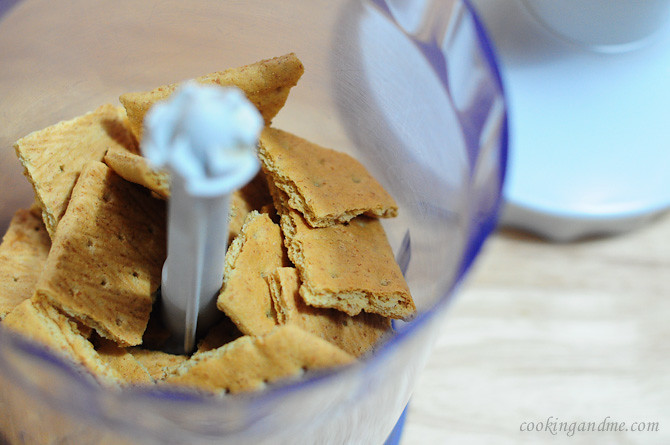
Give them a whiz in your food processor to turn into crumbs. You can even put them into a ziplock and use a rolling pin to smash them into small pieces. I always take the easy way out, especially when the end result won't show much difference anyway.

Eggless No-Bake Mango Cheesecake Recipe

Time to pour in some melted better.

Eggless No-Bake Mango Cheesecake Recipe

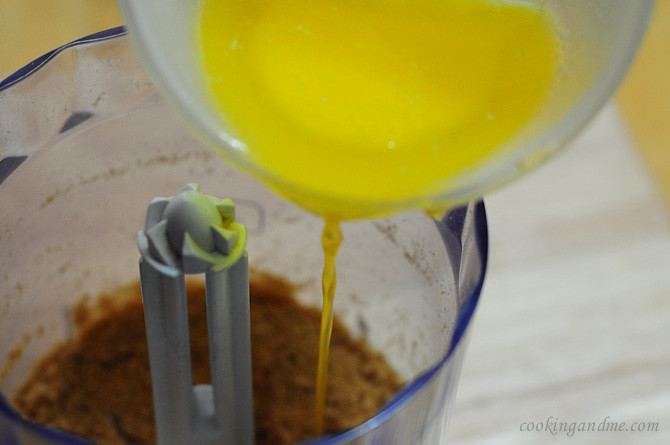
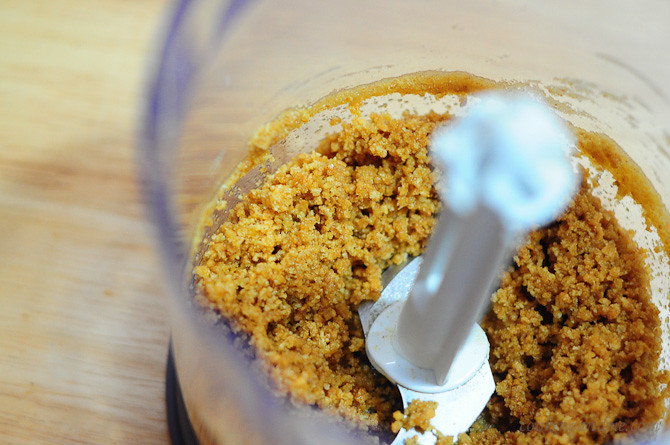
Give the mixture another whiz so that the base becomes moist and crumbly, just the way we want it. At this time, I urge you to smell this mixture. I swear it already smells a bit like cheesecake!

Eggless No-Bake Mango Cheesecake Recipe

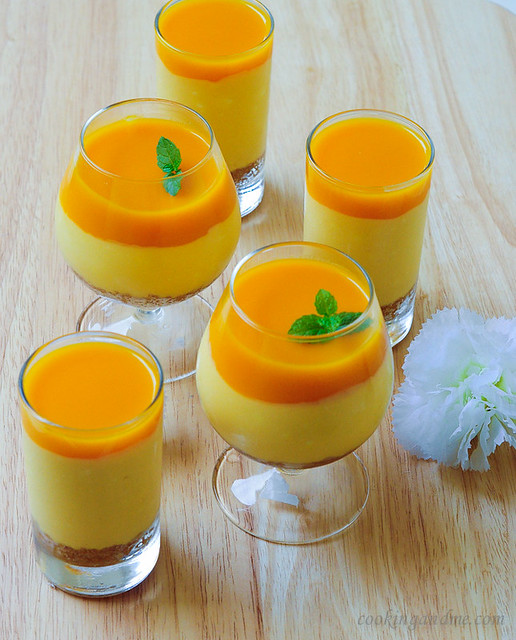
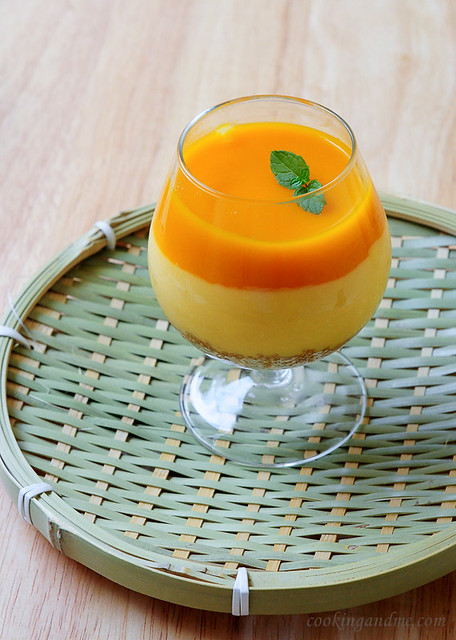
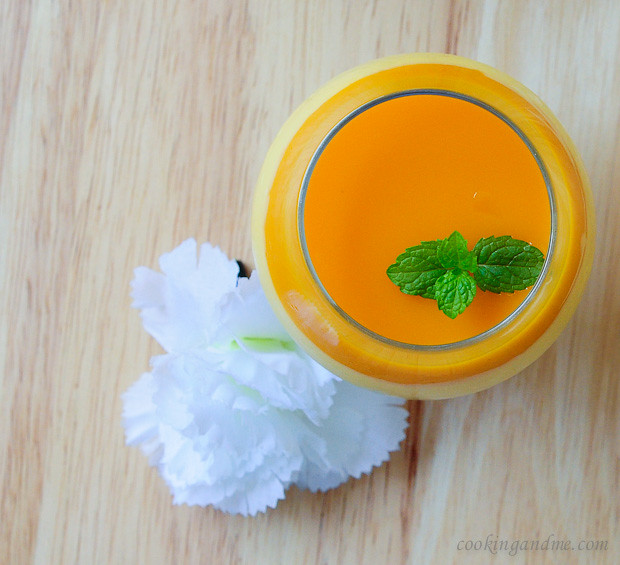
Now, you can go many routes. Use an 8" springform pan if you want one full cake which you can later slice up. I decided to set them in individual glasses and picked out whatever I had in hand. This will make serving much easier, especially if you are making this for a small party or something. Also looks infinitely prettier.

Eggless No-Bake Mango Cheesecake Recipe

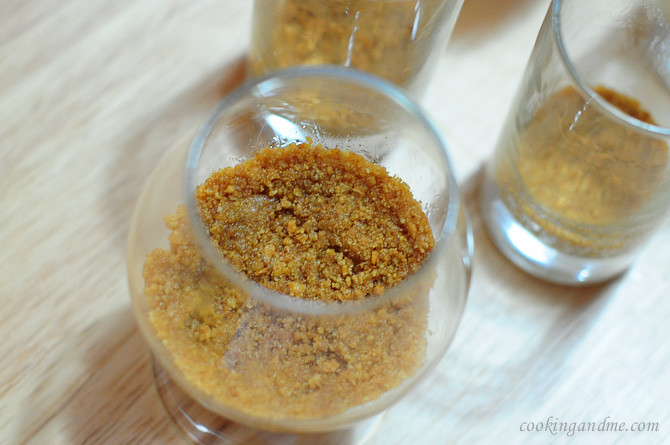
Spoon some into each glass and press firmly with the back of a spoon or fingertips. Leave this in the refrigerator while the rest of the cheesecake is prepared.

Eggless No-Bake Mango Cheesecake Recipe

Mix well together the cream cheese, sugar, and cream. You can do this with a whisk by hand since you are not going to beat it much, just until it all comes together. I used my Kitchenaid for the job.

Eggless No-Bake Mango Cheesecake Recipe

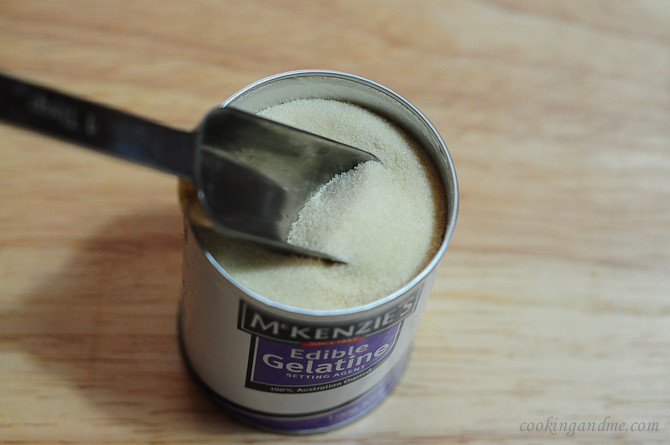
Time to bring out the gelatine. This is our setting agent, since this is a no-bake cheesecake recipe. You can also use china grass, I am sure, but I haven't tried it with that. If you want to go that route, I would recommend starting with 5gm and following the rest of the steps as mentioned here.

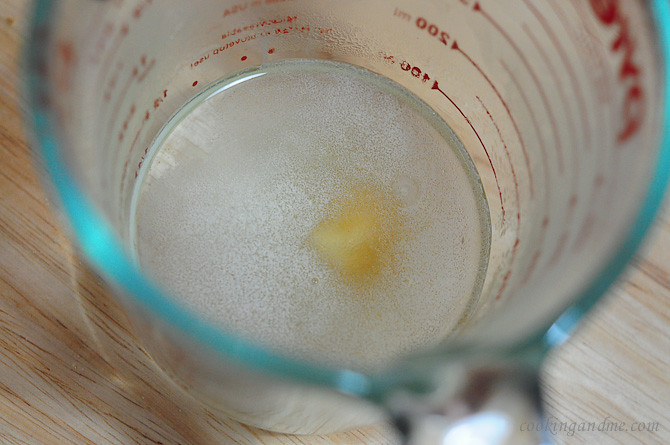
Dissolve 1 tbsp gelatine in hot water.

Eggless No-Bake Mango Cheesecake Recipe

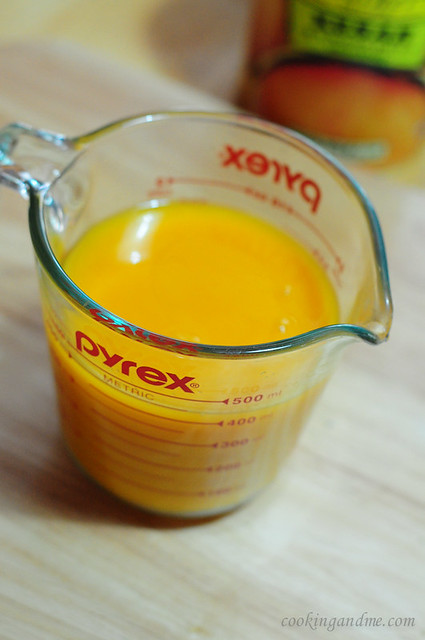
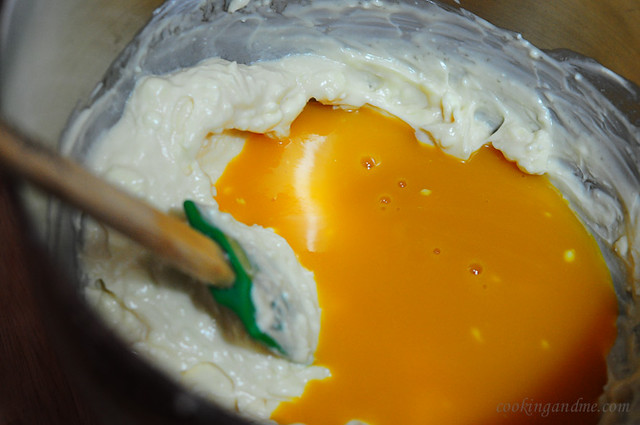
Mix this into the mango puree. I used canned mango puree but if you have fresh mangoes that you want to use up (lucky you!), then go for that, please. Make sure the mango puree is well combined with the gelatine mixture.

Eggless No-Bake Mango Cheesecake Recipe

Reserve half and pour the rest into the cream cheese mixture. Incorporate well. This is our middle layer or the main part of the cheesecake. How easy was that?

Eggless No-Bake Mango Cheesecake Recipe

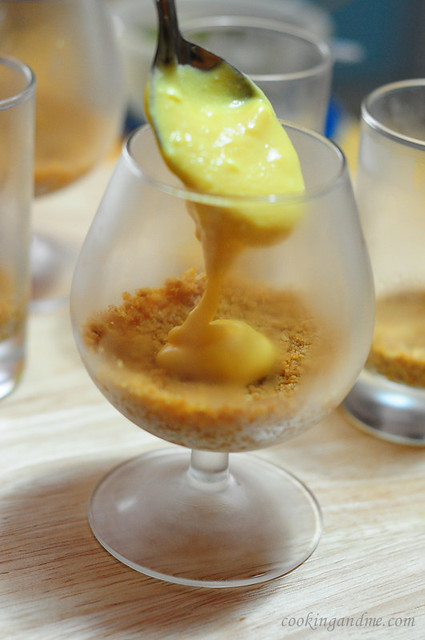
Bring out the glasses from the fridge and spoon the cheesecake mixture into each, until about 3/4th full. Return to fridge for atleast 10 mins. I took them out in about 15 mins or so.

Eggless No-Bake Mango Cheesecake Recipe

Eggless No-Bake Mango Cheesecake Recipe

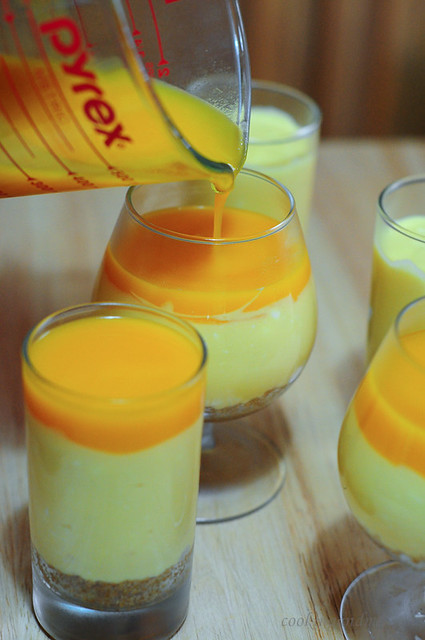
Once the cheesecake has set a bit in the fridge, pour the reserved mango-gelatine mixture gently on top of the cheesecake. If you don't do the refrigerating bit after you pour in the cheesecake, that will blend into the top layer that you are pouring in now so its important to let the cheesecake mixture set for a bit.

Eggless No-Bake Mango Cheesecake Recipe

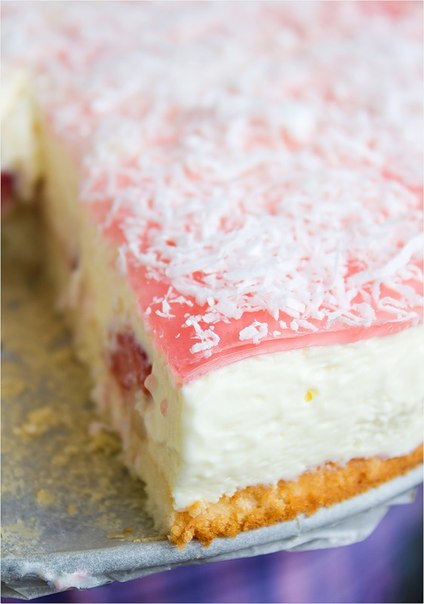
That's it! Refrigerate overnight or atleast 6-8 hours for a delicious dessert.

Eggless No-Bake Mango Cheesecake Recipe

Full credit for this recipe goes to my classmate from school, Swetha and her cousin. She emailed me this recipe long back and I had kept it starred for ages. Glad I got around to finally making it. This is an easy dessert that makes you look really good for making it, just the kind I love!

Here's the recipe, all in one place.

Eggless No-Bake Mango Cheesecake Recipe

Ingredients:
Cream cheese - 1 block (250gm, Philadelphia Cream Cheese)
Cream - 170 gm (I used Nestle)
Sugar - Half a cup
Mango puree - 3/4 of a cup
Gelatine - 1 Tbsp
Hot Water - 1/4 cup
Graham cracker crumbs - 1.5 to 2 cups (Depending on how thick you want the base to be)
Unsalted butter, melted - 75 gm (about 1/3 of a cup)

How I Made It:

1. Whiz the graham crackers in a food processor. Add melted butter and whiz again until the mixture comes together. Press into the bottom of an 8" springform pan that's lined with aluminium foil or use individual glasses. Refrigerate while preparing the rest of the cheesecake.

2. Mix the cream cheese, cream, and sugar in a bowl until well combined. You can do it by hand or use low speed on your Kitchenaid. An electric beater is not needed.

3. Add the gelatine to the hot water and stir till it completely dissolves. Add the mango puree and stir well. Keep half of this mixture aside and add the rest to the cream cheese mixture. Stir gently until well combined.

4. Pour on top of the graham cracker base. Return to fridge for another 10-30 mins.

5. Pour the mango mixture as the third layer. Do this gently so that the layers don't combine. If you use a springform pan, the top layer will be much thinner, as it should be.

6. Refrigerate overnight and get ready to serve a yummy dessert at your party that can be prepared well in advance!

Eggless No-Bake Mango Cheesecake Recipe  http://www.cookingandme.com/2011/06/eggless-no-bake-mango-cheesecake-recipe.html
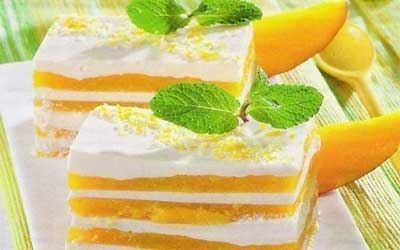
Mocha Marble Cake with Choc Coffee Beans


mocha_marble_cake-3
I'm not exactly sure how it happened. I used to be one of those people who almost never drank coffee, who would gloat at the people who would stumble around bleary eyed until they had their morning caffeine hit, who would get by on cups of tea with my breakfast. But somehow, I have recently become completely dependent on coffee. I no longer feel human until I've had my morning jolt. I blame the many months of sleep deprivation and stress from to juggling work, wedding planning and well, a lot of other personal crap. I thought I had managed to avoid it. Other than a brief love affair with large mochas in my first year of uni, I was always a tea girl. Now I'm a tea and coffee girl. And I love hot chocolate and milo too. I'm a hot beverage slut...
mocha_marble_cake-2
Even though I never used to drink coffee, I've always quite enjoyed coffee in desserts. Tiramisu, affogato, coffee cheesecake, all good with me. I thought I'd celebrate my new love of coffee with a layered cake that was lightly layered with coffee and cocoa. I decided to make a classic marble cake, but instead of just swirling vanilla and chocolate cake batter together I also added a bit of coffee to the chocolate batter. And then a slathered the whole thing in a very fluffy and light icing with just a hint of chocolate and coffee. I didn't want the coffee flavour to be too intense and overpowering, and it turned out just like I hoped. Then I covered the whole thing in lots of dark chocolate covered roasted coffee beans, for that extra hit of coffee flavour and bitterness. So good! Though you will probably be bouncing off the walls after having a slice of this, especially if you have a cup of coffee on the side.
mocha_marble_cake-7
I adapted my mocha marble cake recipe from Martha Stewart's best marble cake recipe. I might have gotten the ratio of vanilla to mocha cake batter slightly off as the marbling is on the light side, but the flavour is spot on. I love this cake. It's not too sweet, with just a hint of coffee and not enough to make it bitter (though make sure you don't use super crappy coffee or it will be bitter). It's soft, fluffy, with a very fine crumb and the buttermilk ensures that it's not the least bit dry. I would have preferred to have made at least another layer of cake to give it some impressive height, but I only had enough butter to make two. We go through a lot of butter in my house.
mocha_marble_cake-5
You could eat the cake on its own if you were feeling guilty about the masses of sugar and butter in the icing. But I'd rather eat a delicious slice of icing-covered cake (translation: happiness-covered cake) on the rare occasion as a treat, rather than have a less tasty, butter-free, sugar-free version more often. Plus it would be a shame to miss out on this luxurious icing. It's whipped up to be as light as a cloud, it's so creamy and smooth and the lovely mocha flavour lingers lightly on your tongue as you eat it. The added crunch and bitterness of the coffee beans on top is a good contrast in texture and flavour.
mocha_marble_cake-4
Mocha Marble Cake with Chocolate Covered Coffee Beans
(makes one 18cm round cake, adapted from Martha Stewart's Marble Cake recipe)
For the mocha marble cake:
115g (1 stick) unsalted butter, room temperature, plus more for greasing
300g (1 3/4 cups) cake flour (not self-rising, I used 270g plain flour + 30g (3 1/2 tbsp) cornstarch as per these instructions)
2 tsp baking powder
1/2 tsp salt
225g (1 cup) sugar (I used caster sugar)
3 large eggs, room temperature
1 tsp pure vanilla extract
2/3 cup buttermilk, room temperature
1/4 cup boiling water + 1 tsp instant coffee granules (or 1/4 cup freshly brewed coffee)
1/4 cup Dutch-process cocoa powder

For the mocha icing:
250g salted butter (or unsalted butter + 1/4 tsp salt)
575g (about 4.5 cups) icing sugar , sifted
1/4 cup milk
1 tsp instant coffee granules
1 tsp cocoa powder
Optional: Chocolate covered roasted coffee beans to decorate (I got mine from Captain Coffee)

Preheat oven to 180°C (350°F), grease and line the base of two 18cm round cake tins with baking paper. (You can also use a 20cm tin but the layers will be thinner, I used one 18cm tin and baked one layer after the other) Sift flour, baking powder and salt into a bowl and use a whisk to combine, set aside. Place butter and sugar in a large mixing bowl and beat on high with an electric mixer until light and fluffy. With the mixer on medium speed, add eggs one at a time until combined, scraping down the sides of a bowl with a spatula when needed. Add vanilla and beat again until combined. Add flour mixture in 2 batches, alternating with the buttermilk and beginning and ending with the flour. Place 1/3 of the mixture in a separate bowl.

In a small bowl, mix the cocoa, instant coffee granules and 1/4 cup of boiling water, whisking until it is smooth. Gently mix into the separated bowl of cake batter until combined. Spoon half the vanilla batter and half the mocha batter into the prepared cake tin, and the other half of each batter into the other prepared tin, alternating spoonfuls of vanilla and mocha to simulate a checkerboard. Run a table knife through the batter in each tin to create a swirl effect. Bake for 25-30 minutes or until a skewer inserted into the centre of each cake comes out clean. Cool in tin for 10 minutes and then remove from tin and cool completely on a wire rack. Cakes can be made the night before assembly, wrapped in clingfilm and chilled.
mocha_marble_cake-14
Prepare the mocha icing; remove the salted butter from the fridge 30 mins before starting. Place butter in a large mixing bowl and beat on high with an electric mixer until light and fluffy. Place milk, coffee granules and cocoa in a small bowl and whisk until dissolved (I zapped the bowl in the microwave for 15 secs to help it dissolve faster) I use a food processor to get the lumps out of my icing sugar, to save me a lot of sifting. With the mixer on low, gradually add icing sugar until combined, then increase speed and gradually add coffee mixture. Beat on high until fluffy and well-combined. You may need to add more sifted icing sugar if your icing is too runny. It should be smooth and fluffy, easy to spread but stiff enough to hold its shape.

Assemble your cake; if the cakes are slightly domed in the centre you can use a long serrated knife to level the tops of the cake. Place one cake layer on your cake stand and use a spatula to smooth a decent layer of icing over the top of it. Sandwich other cake layer on top and then crumb coat the whole cake with more icing. Chill in the fridge for at least 15 minutes to set the crumb coat. Cover whole cake evenly with the rest of the icing, using an offset spatula to smooth the surface (regularly running the spatula until hot water will help with smoothing it). Decorate the top of the cake with chocolate covered coffee beans. Chill for at least another 30 minutes before serving. Can be stored in an airtight container in the fridge for several days.
mocha_marble_cake-6   http://www.raspberricupcakes.com/2012/02/mocha-marble-cake-with-choc-coffee.html

Raspberry Pretzel Jello

 This recipe has become very popular in the Russian/Ukrainian community – and for good reason. It makes your taste buds dance!  I have zero self-control around this dish, so I was concerned about making a 13×9 -inch pyrex filled with this dreamy goodness, for just the two of us. We made it last night…. it’s half gone. Try it and you’ll understand. If you have “issues” with Cool Whip, just replace it with your own whipped cream. I picked up this recipe from Tanya – a gal at our church who never fails to impress her guests with scrumptious food.
Cost to Make: $6 to $7
Servings: 12-15 (unless you live at my house)
Ingredients for Raspberry Pretzel Jello Recipe:
6 oz package Raspberry Jell-O
2 cups boiling water
2 cups pretzels
1/4 cup sugar
1 stick butter
1 (8oz) package cream cheese – softened
1 (8oz) package Cool Whip – thawed
1 cup sugar
1 bag frozen raspberries – thawed in refrigerator
How to Make Raspberry Pretzel Jello:
1. Pre-heat oven to 350 degrees F.
2. Combine Jell-O and boiling water and set aside to cool to room temperature
3. Crush pretzels in a ziploc bag, using a rolling pin.

4. Melt butter and 1/4 cup sugar in saucepan. Add pretzels and mix together.


5. Lightly press pretzel mix into a 13×9 -inch pyrex dish.

6. Bake for 10 minutes, then cool to room temperature.
7. Beat cream cheese and 1 cup sugar on medium/low speed until well-combined.


8. Stir in Cool Whip using a spatula.

9. Spread mixture over cooled pretzels and refrigerate 30 minutes.

10. Pour Jell-O over cream cheese mixture and drop raspberries evenly on top. Refrigerate until jello is set.

Note: I mixed the raspberries into the jello, then poured it over, but you have to do that very fast or it starts to solidify before you can spread it evenly.   http://natashaskitchen.com/2011/04/12/raspberry-pretzel-jello/

Lemon srimps

Melt a stick of butter in the pan. Slice one lemon and layer it on top of the butter. tPut down fresh shrimp, then sprinkle one pack of dried italian seasoning. Put in the oven and bake at 350 for 15 min.

Творожный десерт с манго

На 8 порций:
Состав
24 г желатина
3 яичных желтка
120 г сахарного песка
150 г творога (20%-ной жирности)
сок 1 лимона
400 г натурального йогурта
250 г сливок
3 манго

Приготовление
1. Для творожной массы замочить 18 г желатина. Желтки растереть с сахаром и взбить. Подмешать творог, лимонный сок и йогурт. Отжатый желатин распустить, смешать с 2 стол. ложками творожной массы и подмешать к основной творожной массе. Поставить в холодильник. Как только крем начнет застывать, взбить и подмешать сливки.
2. Для манговой массы замочить 6 г желатина. Манго очистить, мякоть срезать с косточки дольками и нарезать кубиками. Взять 400 г кубиков манго и сделать пюре. Желатин отжать, распустить и смешать с 3 стол. ложками пюре. Ввести в основное пюре.
3. Форму (1,5 л) выстлать пищевой пленкой и выложить слоями творожную массу, чередуя ее с манговой. Затем форму накрыть пленкой и поставить на 4 ч в холодильник. Перед подачей разрезать на порционные кусочки.

Клубничный чизкейк с белым шоколадом

Ингредиенты:

для основы:
175 г песочного печенья
50 г сливочного масла

для начинки:
200 г белого шоколада
300 г мягкого сливочного сыра
200 г сметаны
225 г клубники

Приготовление:

1. Измельчить печенье в крошку и смешать с размягченным маслом.

2. Плотно утрамбовать массу на дно и стенки круглой разъемной формы диаметром 20 см.

3. Поместить в холодильник.

4. Растопить шоколад на паровой бане или в микроволновой печи.

5. Взбить сыр и сметану до образования густой однородной массы.

6. Добавить нарезанную клубнику и перемешать с растопленным белым шоколадом и сырным кремом.

7. Выложить массу в подготовленную форму.

8. Разровнять и поставить примерно на 4 часа в холодильник для застывания.