Labels

"Погребок"- заготовки на зиму(canning) (82) Afternoon Tea-recipes and tradtions (41) All about Sushi rolls and more (2) appetizers (61) Baby Shower (2) Barbecue (45) Beauty (29) Bread and pizza (67) Breakfast Sunday Brunch (18) Bridal Shower and Wedding (8) burgers sandviches and toasts (22) Cake decorating and gum paste flowers (144) Cake pops and balls (35) cakes (197) canning (31) cheesecakes (31) Chocolate (38) Christmas (102) Coffee and Latte Art (22) Coffee cakes pies sweet breads (74) cookies (226) Cupcake Muffin Пирожное (62) Decorated cookies tutorials (48) Decorating Easter Eggs (19) Dessert (46) Easter (52) Easter and Spring (29) eggplants (3) eggs (11) Father's Day (4) Fish and seafood (30) French cooking (14) fresh fruits (6) gingerbread (68) Healthy Eating (32) Homemade gifts (3) Hапитки (30) Italian food (39) jams and jellies (33) Jello salads and desserts (17) Kашки (4) Kонфеты и другие сладости (42) Kремы-Buttercream-Frosting (4) Kрымские блюда (14) Main course (36) Main Dish (53) meringues зефир marshmallow pastilage (40) Mexican-Spanish food (34) Mothers Day (7) Mяско (59) Nutella (5) Olive Garden recipes (3) oranges (3) Oriental food (8) Oформление салатов (41) Pasta (16) plums (2) Potluck (6) Poultry (31) pumpkin (19) Pецепты Джейми Оливера (5) Pецепты Сталика Ханкишиева (37) Quinoa (5) Risotto Jambalaya Плов Paella (27) salads (123) Sauces Dips and Spreads (38) Saving money in the kitchen (4) Side Dish- гарнир (15) Slow-Cooker (9) soups (105) Summer recipes (12) Table setting etiquette(Сервировка стола) (67) Tagine-cuisine of Morocco (13) Thanksgiving and Fall (46) Tатарская кухня (6) Tесто (17) Valentines Day (36) Video-рецепты (20) Блины блинчики и оладушки (44) блюда в горшочках (23) Блюда из курицы (60) Блюда из теста (56) булочки (103) Вкусности из детства (63) Вкусные местечки-Sweet places (7) Детский праздник (29) Заготовки-полуфабрикаты (44) заливное и холодец (13) Запеканки и омлеты (11) история блюд и кулинарные истории (24) Котлеты Тефтели Голубцы и Перчики (58) Мороженое-Ice Cream (15) овощные заготовки (18) пирожки чебуреки беляши и т.д. (42) Пляцок (2) рулеты мясные и овощные (36) Сосиски и домашние колбаски (26) Старинные русские рецепты (38) Творожная выпечка (13) Узбекская кухня и Среднеазиатская (66) Хворост Крепли вергуны Пончики (25)

Sunday, August 21, 2011

Valentine’s Day Cake Pops


IMG_5907
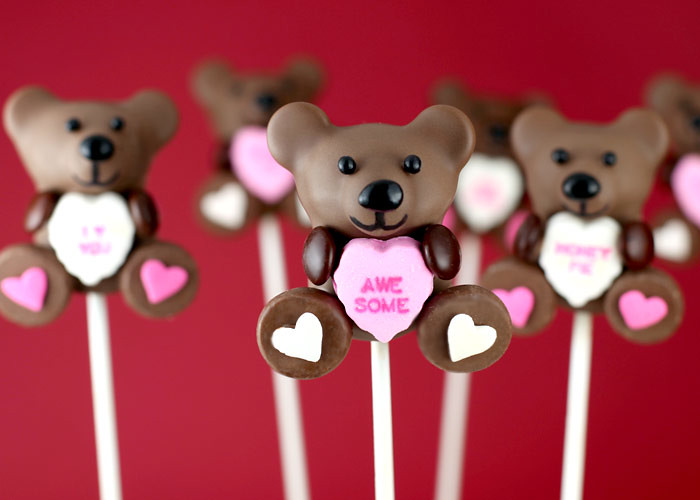
I’ve already made some cake pops that look like conversation hearts, using pastel candy coatings and a heart-shaped cutter. They’re in my Cake Pops book. But, this weekend I wanted to try using real conversation heart candies to make some cute teddy bears look awesome.
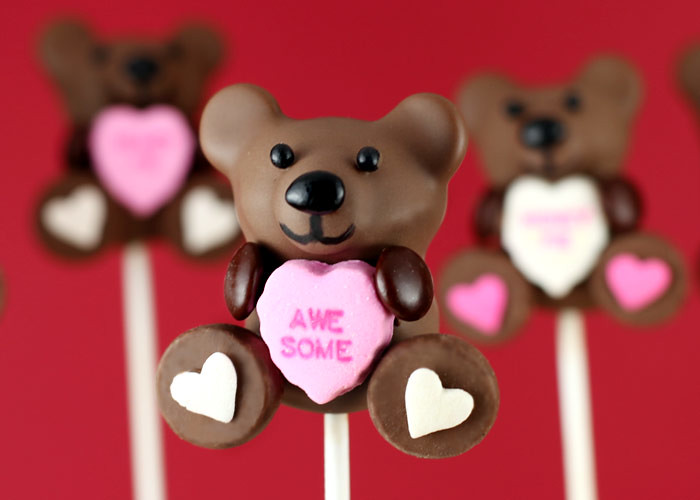
IMG_5812
Awe. Some.
IMG_5929
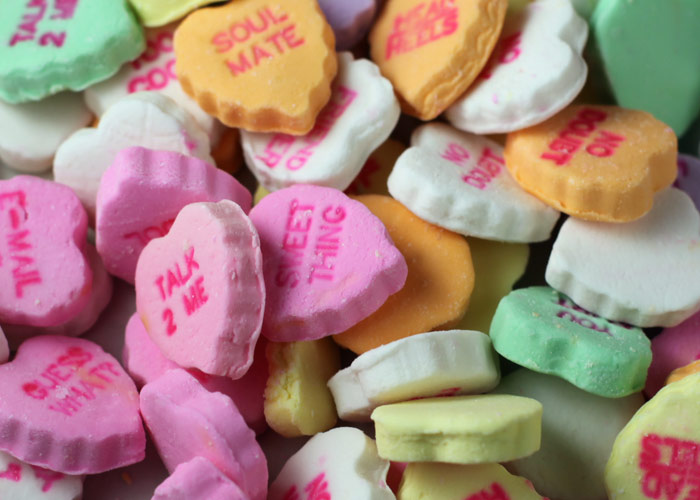
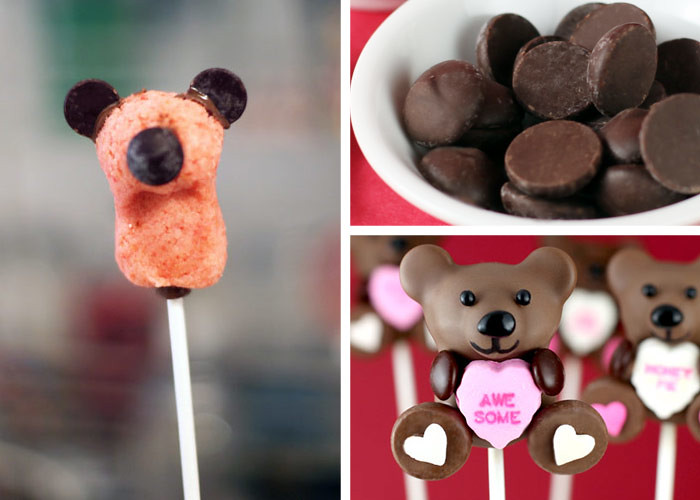
These are large conversation heart candies. Not the little ones you usually see. They are about 1 inch tall and just the right size to place in front of teddy bear’s belly. (Found at Hobby Lobby craft store by the way.)
IMG_5920
I’ve also already made teddy bear cake pops. They are in the book, too. But they aren’t the entire body… just the head.
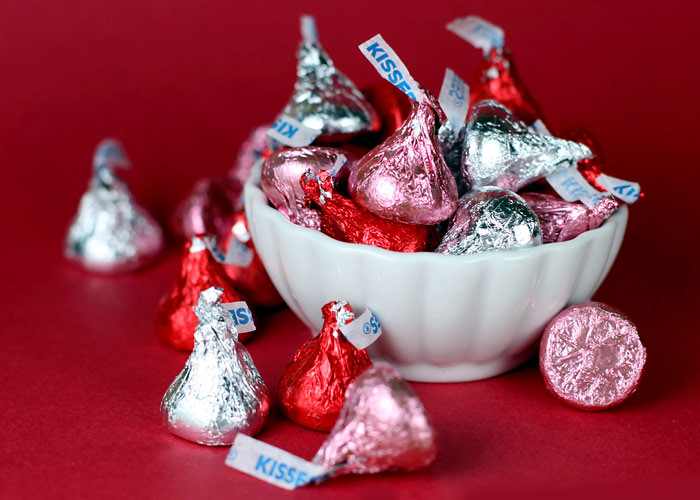
So for these I thought Hershey’s Kisses would make perfect legs. Perfect enough to resemble a plush doll anyway.
For his arms, his front paws… I used brown M&M’s candies. I could have used a slightly larger candy, but these were pretty close to the color of the Kisses and the chocolate candy coating that I used for the bodies, so I rolled with it. Besides, it’s all I had on hand that was close enough to work and also look like he was holding the heart.
IMG_5864
For the rest of the details I used the following…
IMG_5940
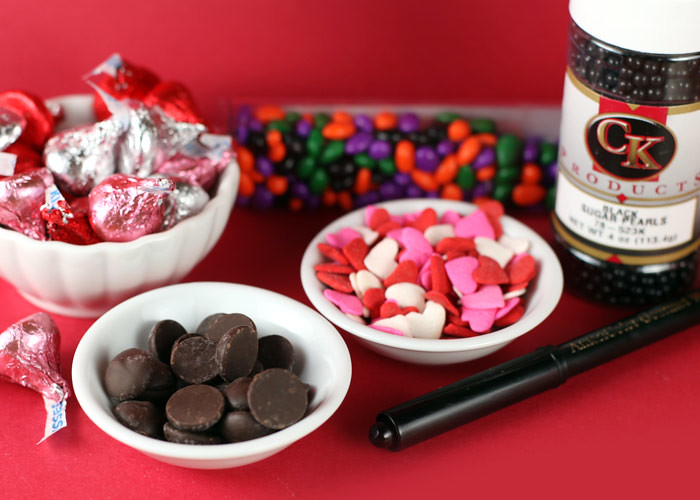
Large jumbo heart sprinkles on the legs.
Black coated sunflower seeds for noses.
Black sugar pearls for eyes
A black edible ink pen for smiles.
Oh and chocolate chips to help shape the bear’s structure. (FYI – These are Ghiradelli chips. They are larger chocolate morsels and worked great since I was going for bigger ears. They are also a bit flatter, so they weren’t too pointy when placed in position for the nose.)
Untitled-1
After rolling out your cake balls (see basic cake pop instructions here), chill in the freezer to get them firm and easier to shape. Take your ball and shape it kind of like a peanut. Use one of your heart candies to press on the front and flatten out the bear’s belly on the lower half.
Melt some chocolate candy coating. Dip the edge of two chocolate chips in the melted coating and insert into the bear cake pop shape for ears. Attach a third chip to the front of the bear’s face to help his nose protrude a bit. Insert your lollipop stick into the coating and then insert about halfway into the shaped cake ball. Return pops to the freezer to firm up again for just a couple of minutes.
After chilling, dip the entire body into the bowl of melted candy coating. Make sure the bowl is deep enough to dip and remove in one motion. The coating should also be thin enough to completely coat the pop without having to stir it in the bowl.
Gently tap off any excess coating. Attach nose, conversation heart and legs while the coating is still wet.
Place in a styrofoam block to dry.
When dry, you can dip your toothpick into some of the leftover melted coating and dot some in position for the eyes. Then just attach the sugar pearls. Dot some on the legs and attach the jumbo heart sprinkles. Apply a little bit of coating to one side of the M&M’s candies and attach them to the body so they appear to be holding the hearts.
Then just draw on some sweet smiles.
Voila. Huggable lovable bears.
IMG_5853
Have fun!
  http://www.bakerella.com/valentines-day-cake-pops/

Valentine Cake Pops


Well, I finally got this blog thing straightened out (sort of.) I'm not sure what's going on with the posting...its different from before. If anyone has some answers, I'd love to hear from you!

On to the post...

Valentine Cake Pops!


Here are this year's Valentine's Pops.


Jack is taking them tomorrow with his Valentines. I'll post his Valentines next.
Happy Valentine's Day (almost!!!) 

Summer Cake Pops


Despite the wacky weather that has made its way in one way or another across the country, I think we can all agree at this point that summer is finally here (ahhhhh :) That being said, I thought I might share with you some of my favorite ‘summer’ cake pops that I’ve recently stumbled upon.
What’s a summer picnic without watermelon? These creations by Natalie’s Cake Pops are too cute:

I happen to have a summer birthday and personally I will take ice cream over cake 100 times over (did The Cupcake Tower lady really just say that???) but these cake pops ‘appear’ to be the best of both worlds and just might sway me:

I found them on Design Eat Play. Crissie is a fabulous photographer (jealous) who devoted one of her posts to bragging about her sisters cake pop skills. She also included these apples

and a different version (equally adorable) of watermelon cake pops

Anyone up for camping? Or perhaps just a firepit in the backyard? Just a Bite Cake Pops created these S’mores Cake pops that appear to me to rival the real deal

I couldn’t complete this post without including these darlings from the original Cake Pop Queen herself Bakerella. It just wouldn’t be a summer BBQ without bees and burgers!


What is your summer specialty (either cake pops or cupcakes)? Do you have any pics of your summer creations displayed on your Cupcake Tower? Share them here on our Facebook page.  http://www.thecupcaketower.com/summer-cake-pops/

monkey pops

 Curious George Cake Pops

Christmas Cake Pops


The Christmas Cake Pops was created on or around 2010-12-15.
Christmas Cake Pops The Christmas cake pops are made by molding cake into the shape of the tree or hat. The trees are decorated with green candy coating with decorations made of colored candy pieces. A candy star tops off the tree. The tree texture is made by painting on candy coating with a brush to make the surface rough and irregular.
Christmas Cake Pops The santa hats start out with a similar shape made with cake. They are are covered with red candy coating. The top "fuzz ball" is made with a white spherical candy. The base of the hat is decorated with white sugar crystals.
Christmas Cake Pops The cake pops have sticks inserted so they can be easily handled and eaten without getting candy coating all over your hands.
Christmas Cake Pops The cake pops come from Bakerella's website and book.
Christmas Cake Pops The Frosty the Snowman cake pops start out as standard cake balls. They are dipped in white chocolate candy coating.
Christmas Cake Pops Frosty's hat is made of a chocolate dot for the brim and a Roll-o for the hat. Frosty's nose is made from a Red Hot candy. His eyes are also made of candy.
Christmas Cake Pops Frosty's pupils and smile are drawn on with a food-safe pen.  http://crazybeautifulcakes.com/gallery/christmas-cake-pops/

Thanksgiving Cake Pops

Thanksgiving Cake Pops 2010
Tom Turkey cake pops. These were inspired by Bakerella who created Cake Pops  http://dreamers.marthastewart.com/photo/thanksgiving-cake-pops-2010

Piggy pops

Blog favorite: Bakerella’s Cake Pops


Photos: Bakerella
Dear Martha,
One of absolute favorite bake bloggers – Bakerella – has released a book about her Cake Pops: Cake Pops: Tips, Tricks, and Recipes for more than 40 Irresistible Mini Treats. Yay! Finally. Recipes!

Loooove
the Cake Pops! (and have written about them before).
She’s so crafty with her sugar and tools – so inspiring!
These are my favorites at the moment: Ice Cream Cones.


You’ll find more about them here.
And look at those Wedding Cake Pops. Aaaawh! Sooo cute. See more herehttp://www.dear-martha.com/?p=2492

Give The Gift Of Cake Pops

Need some festive ideas to dress up your Thanksgiving table this holiday season? Need an alternative to the normal desserts you offer at Christmas? Cake Pops are the perfect remedy. Often described as a “deliciousness on a stick“, we have dressed them up in a variety of shapes for both Thanksgiving and the winter holidays. We roll up any of our wonderful flavors of cake, place it on a stick and enrobe them in chocolate. That’s when the fun begins, as the magically creative decorators here turn these blank canvases into turkeys, pine cones, snowman, etc. the possibilities are endless! Orders are currently being accepted for both Thanksgiving and Holiday cake pops – contact us today for more information. Last day to order cake pops for Thanksgiving is November 19.
Thank you to Jenni at Awaken Photography for supplying these wonderful pictures of our latest creations!  http://intricateicings.com/wp/give-the-gift-of-cake-pops/

Owl Cake Pops


cake pops
People are going nuts over cake pops right now.
And by "people" I mean me.
Seriously, these new little balls of cake on a stick are going to take over the cupcake craze. They are that hot!
You may remember these little chick pops that I made for Easter.
They were the beginning of my obsession.
Then I found out that Bakerella, the cake pop queen that designs these sweet treats, was releasing a Cake Pops Book!
I pre-ordered the book, waited anxiously for it to arrive, and now that it's here I am truly addicted.
I am pretty sure I will spend countless hours in my kitchen trying to replicate the cake cuties that this creative genious has concocted, but for now I'm feeding my new addiction with these owl pops.
They're perfect for Fall, harvest parties, birthday parties, baby showers and so much more!
Hop over to Barnes and Noble and order your copy of Bakerella's book for full instructions on how to make these oh-so-cute owls and many more fun designs!
Act quickly, though...they're selling fast!
Wanna see Bakerella in action? Check out her how-to video:
  http://www.passion-for-parties.com/cake-pops.html
bakerella cake pops

cake pops pix

Cake pops-pink & green2.JPG - Cake Pops - Pink & Green  Irene's birthday 2011-Art museum & lunch (33).JPG - Cupcake Cake Pops Cake pops-pink, purple, lime 003.JPG - Cake Pops - Pink, Purple, Lime  Greek Easter April 24, 2011 003.JPG - Easter Egg Cake Balls  http://www.twosweet.biz/index.html

Snowman Cake Pops


I made these snowmen pops last year and just never got around to posting them. I think they are pretty darn cute. The black confetti sprinkles are perfect for two eyes made out of coal. The noses are orange sunflower seeds. The mouths are drawn on with a black edible ink pen.
IMG_9703
The hats are made from regular and mini size Oreos.
IMG_5639
Cookies make them even more awesome don’t you think.
Want to make some? Follow the basic instructions for cake pops and use the following to decorate:
White candy melts
Black confetti sprinkles
Orange sunflower seeds
Black edible ink pen
Regular Oreos
Miniature Oreos
Toothpicks
Styrofoam block
  • Prepare the hats first. Separate Oreos and remove the creme center. The miniature Oreos can get a lot of crumbs stuck to the side of the creme center, so take a toothpick and scrape the surface off for a white edge.
  • Use some of the melted coating to attach the miniature Oreo to the regular size Oreo half and set aside.
  • Dip the cake pops and while the coating is still wet, attach the sunflower seed nose and the Oreo hat and let dry.
  • Then attach the confetti sprinkle eyes by dotting on a small amount of coating with a toothpick and attach the sprinkles.
  • Draw the mouths with the edible ink pen and let dry standing in a styrofoam block.
And voila … Snowman Cake Pops … or Snowhead Cake Pops … nevermind.
Now these are pretty cute like I said before… they remind me of what a snowman would look if I tried to build one in the yard. Not that we ever really get that much snow here. They are more like ice men than snowmen in the south. But this weekend I was thinking about them and I decided they were a just little too generic.
So I decided to try something a little more iconic.
Prepare yourself. These really are cute.
IMG_1201
Stop it. I can hardly believe they are real and I made them.
IMG_1226
The hats were made by tinting white candy coating with black candy color to get a dark gray. Then the coating was poured into these candy molds.
IMG_1184
Now, if you want a more floppy hat look like the ones in the back of this photo, then try dipping Reese’s in the gray candy color.
IMG_1217
Unwrap them first… but you knew that. And make sure the coating has cooled off or else it will melt the candies before you can attach them to the hat base.
Want to make some of these? These are more involved, but you can do it. I know you can because a lot of you have been sending me some fantastic pics of snowmen. With licorice scarves and Rolo hats. Keep em coming. Follow the basic instructions for cake pops and use the following to decorate:
White candy melts
White confetti sprinkles
Red mini M&M’s
Black edible ink pen
Red edible ink pen
Black candy color
Pink jumbo confetti sprinkles (You can find jumbo flower sprinkles and you can skip drawing the petals. I just didn’t have any on hand.
Blue confetti sprinkles
Toothpicks
Orange gumdrops
Japanese somen noodles (you can also use pasta, it’s just a little thicker.)
Disc candy mold
Cordial cup candy mold
Reese’s (optional)
  • Prepare the hats first. Melt candy coating and add candy coloring until the desired shade of gray is achieved.
  • Pour coating in the molds and place in the freezer for a few minutes to set.
  • When completely dry, remove and attach the top of the hat to the base by using some melted candy coating.
  • Then attach a pink jumbo sprinkle to the hat using a small amount of candy coating. Next attach a smaller blue confetti sprinkle on top of the pink one. If you can find jumbo flower sprinkles, you can skip drawing the petals on.
  • With a black edible ink pen draw on the hat details if you like. But be prepared to suck up the ink in your edible in pens.
  • Now dip the cake pops in white candy coating. Before the coating sets, attach the hats to the snowman head.
  • Use a new block of styrofoam… one that hasn’t been used for cake pops before. Because you will want these to stand straight up due to the weight of the hat. If you use old styrofoam, the integrity of the holes may be compromised and they might fall over.
  • When they are completely dry, attach the nose and eyes using more melted candy coating.
  • Draw on the mouths and the eye details with the black edible ink pen.
  • Then cut some orange gumdrops into smaller shapes.
  • Use a toothpick to drill a small hole in the cake pop mouth.
  • Break noodles down into one inch pieces and insert one end into the gumdrop shape and the other into the mouth for pipes. By the way these will be extremely delicate, so space them out in the styrofoam.
  • Note: you can also drill holes into a wood block to guarantee straight holes.
Oh yeah…
Happy New Year!!!
You know I had to kick it off with cake pops, so hope you like em.
IMG_1145  http://www.bakerella.com/snowman-cake-pops/

Conversation Heart Cake Pops


When conversation hearts and cake pops collide: