Although I have several strawberry cutters, I wanted to make something fresh and new, so I took a little different approach. This is what I came up with.

They may look complicated, but these cookies are deceptively simple to make. All you need is a square or round cutter, and a mini-strawberry cutter.

Before baking, I used the mini strawberry to make an inpression on the cookie. You can always skip this step and draw the berry freehand, but I like the uniformity of this method.
Once the cookies have baked and cooled, you will have an impression to guide you as you work.

To decorate these cookies you will need:
- red twenty-second icing
- light blue piping and flood icing {I used sky blue Americolor} and a #3 tip
- a tiny bit of light yellow flood and piping icing
- spring green piping icing with a #1.5, #3, and #67 tip {mix leaf green and egg yolk yellow}
- white piping icing and a #101 tip
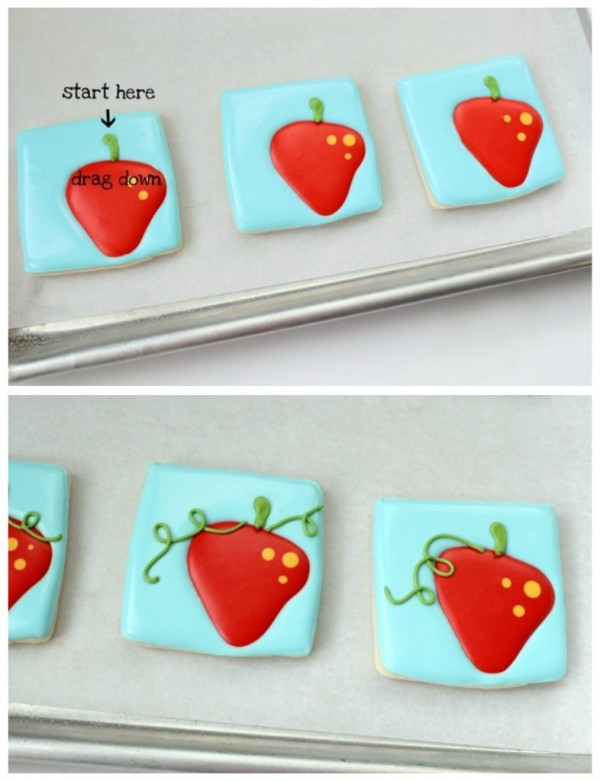
To begin, fill in the strawberry impression with red TSI, which from here on out is my abbreviation for 20-second icing. If Rachael Ray can say EVOO and get it added to the dictionary, than I can say TSI, right?
After that, immediately, use the yellow flood icing to make seed dots. If you want, you can make lots of tiny seeds, but this look appeals to both my aesthetic and lazy sides so I did three. Notice, I forgot the picture, but the dots will magically appear by the next step.

Give the strawberry about 30 minutes to dry {more if you have bleeding issues} then outline and fill the square portion of the cookie with blue. I find that going around the shape first with flood icing, and then flooding out toward the outline produces a cleaner edge where the two colors meet, so I suggest doing it in this order.
Ideally, it would be best to let it dry completely before moving on to the accents, however, I was in a huge hurry when I made these so I cheated a little and added the details while the cookie was still a bit wet.
First I added a stem using a #3 tip. I started about 1/4 inch above the red, placed the tip as close as I could to the cookie without damaging the icing, and squeezed as I moved down toward the red. Then, I switched to a #1.5 tip and added the little tendrils which I don’t think strawberries really have, but they looked cute…
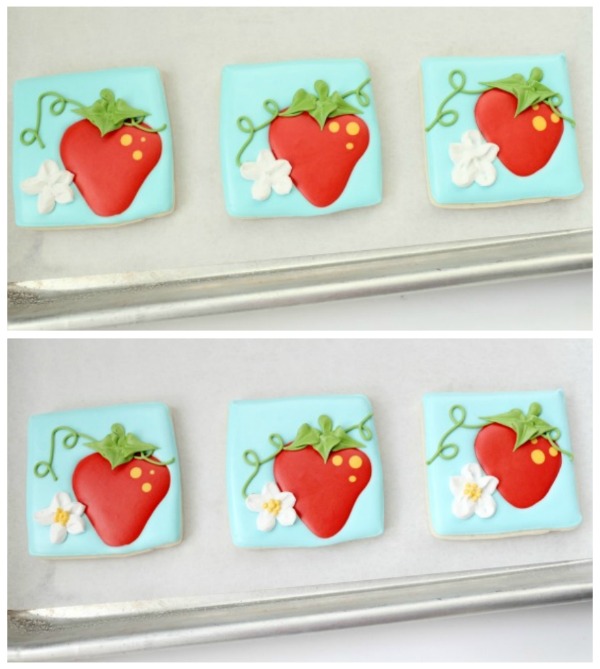
After that, I switched to the #67 tip and added the little top part, or sepals, if you want to get technical. Seriously. Those leaf-thingies are called sepals. I grew up in a house of geniuses and when you live with geniuses, you pick up little things like that.

Anyway, next, I added the strawberry blossom using the #101 tip. This was another cool thing I learned in my Wilton class. Technically you should do this ahead of time using a flower nail, but I adapted it a bit and piped the flower directly on the cookie.
Since the icing was still soft, and I could not get too close to the surface without denting it, and made a little mess of this. It worked, but if you really want them to be as pretty as they are meant to be, Wilton has a good tutorial HERE. You should probably do it that way rather than mine.
Finally, use the yellow and a #1.5 tip to add dots to the flower middles {you don’t even want an explanation on the technical aspects of that} and then let them dry.

The next day you will have gorgeous and unique strawberry cookies. They can be any color you like, of course, but I love how the sky blue and red look together.

Pretty, YES!

Don’t forget to check out Andrea’s blog, Knitty Bitties and her strawberry themed baby shower. You can see all the of the gorgeous details, including the strawberry cookies I made for her.
While we’re on the subject, I ought to let you in on another little secret. Andrea sews. WELL. She made me the cutest camera strap cover I’ve ever seen.
Now, my selfish side wants me to keep it a secret, so I will be the only one in my town with a cool camera strap, but they are too pretty to keep all to myself. So, be sure to check out her ETSY shop also! You’ll soon be wanting happy little camera straps in every color. Blueberry Fields is my fave this week.
I hope this gave tons of inspiration for strawberry cookies of your own! Looking forward to seeing them on my Facebook page. Have a great week! http://sweetsugarbelle.com/2011/07/pretty-summer-strawberry-cookies/

No comments:
Post a Comment